# Multi-Pass Reporting

Multi-Pass reporting allows you to construct reports that span further across a data model by joining multiple reports together. A Multi-Pass report is a combination of reports, matched on related object fields or object reference fields. Multi-Pass reports support both <a href="/en/gr/3606/#tabular">tabular</a>
 and <a href="/en/gr/3606/#matrix">matrix</a>
 formatting.

## Configuration Overview

  * Admins create _Report Views_, which are admin-only reports used to construct Multi-Pass reports.
  * Admins join _Report Views_ together in a _Multi-Pass_ report type.
  * Users build and run reports from the _Multi-Pass_ report type in a similar manner to existing reports.


### Building Multi-Pass Reports Demo {#building-multi-pass-reports}


The following video demonstrates how to build multi-pass reports:
<video controls width=860 height =504  preload="metadata">
    <source src="https://platform.veevavault.help/108e9b1d-559c-4d48-918b-1e4c5b5a533c/4893620d-646c-4812-8c4c-e34d9d5e735f/4893620d-646c-4812-8c4c-e34d9d5e735f_source__v.mp4#t=0.5" type="video/mp4" >
    
    <track
    label="English"
    kind="subtitles"
    srclang="en"
    src="/en/gr/assets/captions/24r3-building-multi-pass-reports.vtt"
    default />
    </video>

<a href="/en/gr/676770/">Details</a>


## Report Views {#report-views}

_Report Views_ are Admin-only reports used to construct Multi-Pass reports. _Report Views_ allow Admins to define columns, filters, and aliases. Admins may also run the _Report View_ for previewing purposes. _Report Views_ do not support prompts, flash reports, or dashboards. Admins can also leverage the _Date_ <a href="/en/gr/39659/">report type</a>
 in _Report Views_. Though the _Date_ reporting entity is not a true Vault object, this report type allows Admins to configure reports that display records with the date as the primary object.

### Configuring Report Views

Configure _Report Views_ from **Admin > Configuration > Report Views**:

  1. Click **Create**, then select a **Report Type**. **Report Types** are limited to _Object_, _Object with Document_, and _workflow reports_.
  2. Provide a **Name**.
  3. Click **Continue**.
  4. Optional: Add **Filters** to your _Report View_. Filter conditions are applied, but not shown, when you run the final multi-pass report.
  5. Optional: Define columns in your _Report View_ with **Edit Columns**. Columns added to your _Report View_ will appear as default columns on the Multi-Pass report. However, all columns will be available for selection.
  6. Optional: [Group rows][2] by a desired field.
  7. Optional: **Run** the _Report View_ to preview data.
  8. Click **Save**.

<div class="note-border alert-info">
  <div class="alert alert-info" role="alert">
    <div><i class="far fa-info-circle"></i></div>
    <div class="alert-text">
      <p><strong>Note</strong>: <em>Report Views</em> do not support report types with multiple down objects.</p>
    </div>
  </div>
</div>


### Limitations

You can include a maximum of ten (10) report views per Multi-Pass report.

### Grouping on Report Views {#group-rows}

Grouping rows by a specific field on a _Report View_ is similar to grouping rows when creating a standard report, however, there are a few key differences:

  * When building _Report Views_ that have grouped rows, only the grouped-by field will be available to join on.
  * In the final Multi-Pass report, Vault will only display grouped fields.
  * You can still filter the Multi-Pass report on any field from any object used in the report, however, Vault won't display these fields when you view the report.
  * You can filter on aggregate fields.
  * For Multi-Pass matrix reports using a chain format (for example, one primary view, a second view relating to the primary view, and a third view relating to the second view), you can select any field from any report view on x-grouping and y-grouping.
  * For Multi-Pass matrix reports using a ladder format (for example, one primary view and multiple child views relating to the primary view), you can select any field for the first grouping either as an x-grouping or y-grouping. For the next grouping, you can select a field from the same view, but you cannot select fields across different child views.


## Multi-Pass Report Types

A Multi-Pass report type contains one or more _Report Views_ joined together. To create one:

  1. Navigate to **Admin > Configuration > Report Types**.
  2. Create a new report type, and select _Multi-Pass_ in the **Class** field.
  3. Under **Report Configuration**, select a **Report View**. This is the primary view for the Multi-Pass report.
  4. Click **Add Relationship** to add a _Report View_ to join.
  5. Select fields to match on for each view in the relationship and click **Add**. You can match on text, date, object fields and number fields. Date and number fields include aggregates on fields and formula fields on objects. Multi-Pass reports are left join by default.
  6. If necessary, continue adding relationships as needed by clicking **Add Relationship** beneath the report views.
  7. Click **Save**.

<div class="note-border alert-info">
  <div class="alert alert-info" role="alert">
    <div><i class="far fa-info-circle"></i></div>
    <div class="alert-text">
      <p><strong>Note</strong>: Left and inner joins are supported with Multi-Pass reporting.</p>
    </div>
  </div>
</div>


## Creating & Running Multi-Pass Reports

Create a new report from the **Reports** tab to run your Multi-Pass report. Multi-Pass reports support both <a href="/en/gr/3606/#tabular">tabular</a>
 and <a href="/en/gr/3606/#matrix">matrix</a>
 formatting. When building the Multi-Pass report, configure the <a href="/en/gr/3606/#formula-fields">formula fields</a>
, <a href="/en/gr/3606/#conditional-fields">conditional fields</a>
, <a href="/en/gr/8591/">filters</a>
, and <a href="/en/gr/3606/#advanced-options">advanced options</a>
 as needed.

Vault groups Multi-Pass report types based on the primary object of the primary _Report View_. For example, if the primary view of my _Impacted Document Report_ Multi-Pass report type is _Registration with Regulatory Objective_, the report type would be found under _Registration_.

You can group rows by any field from any object used in the Multi-Pass report type, define filters and prompts, create flash reports, and use your Multi-Pass reports on dashboards.

## Relationship Constraint Filters

By default, Multi-Pass reports return all matching records for the primary _Report View_, even if there are filters on a child _Report View_ that would return no results. _Relationship Constraint_ filters limit the Multi-Pass report output to display matching records for the primary _Report View_ only when there is at least one result to be displayed on its child _Report Views_.

To add a relationship constraint filter, select the **primary** _**Report View**_ from the _Relationship Constraints_ section of the left drop-down, select **has at least one** or **does not have any** from the middle drop-down, and select one or more **child** _**Report Views**_ from the right drop-down. Select the <a href="/en/gr/8591/#run-time">**Prompt**</a>
 or <a href="/en/gr/8591/#optional-prompts">**Optional**</a>
 checkboxes as needed. 

Admins can define multiple relationship constraint filters which are implicitly related with an AND relationship. This means that if any child excludes a record across the defined _Report Views_, records in the primary _Report View_ are removed. To achieve an OR relationship, Admins can select multiple views from the view selector drop-down.

Relationship constraint filters are ineligible for advanced filter logic.

## Formula Fields

<a href="/en/gr/52324/">Formula fields</a>
 allow you to define formulas in your Multi-Pass reports. You can add formula fields as columns in your report, and use formulas for grouping, sorting, and filtering. You can also use formula fields to define conditional fields and report filters.

You can define up to 10 formula fields per Multi-Pass report. This does not include formula fields defined in report views. You can add a maximum of 10 formula fields on each report view.

To define a formula:

  1. Under _Formula Fields_, select **Create Formula Field**.
  2. Select a **Report View**.
  3. Enter a **Label**.
  4. Select a **Return Type**. If you select the _Text_ return type, also enter a **Maximum Length**.
  5. Optional: If you select the _Text_ return type, use `**#define**` at the beginning of the formula to simplify long expressions. For example, `#define short_path End_of_Study.Vital_Signs.General_Information`. 
  6. Enter a **Formula Expression**. For more detailed instructions on writing the formula expression, see <a href="/en/gr/42857/">Creating Formulas in Vault</a>
.
  7. Click **Check Syntax**. Vault will let you know if your expression is valid.
  8. Click **Save**.

To edit or delete a formula field, click the formula label.

Filtering on formula fields in Multi-Pass reports does not improve report performance.

### Aggregate Functions

If you group rows, you can add several aggregate functions on text, number, and date fields. You can only select one function per field. Vault does not support aggregate functions on long or rich text fields.

<div class="note-border alert-info">
  <div class="alert alert-info" role="alert">
    <div><i class="far fa-info-circle"></i></div>
    <div class="alert-text">
      <p><strong>Note</strong>: Vault does not support joins on groupings with the List or Distinct List function.</p>
    </div>
  </div>
</div>


Available aggregate functions include:

| Aggregate Function | Definition | Notes |
|--- |--- |--- |
| List | Returns concatenated text of all row values in a group separated by a delimiter and space | Displays a maximum of 1,024 characters; only available for text fields. This function is unavailable on Multi-Pass matrix reports. |
| Distinct List | Returns concatenated text of all row values in a group, excluding duplicates, separated by a delimiter and space | Displays a maximum of 1,024 characters; only available for text fields. This function is unavailable on Multi-Pass matrix reports. |
| Std Dev | Returns the population standard deviation of expression | Only available on number type fields |
| Std Dev Samp | Returns the sample standard deviation of an expression | Only available on number type fields |

To add an aggregate function, click the **Function** drop-down on a grouping in the report editor and select a function.

## Advanced Logic {#adv-logic}

Advanced logic allows you to group together filters, objects, and views, and add _AND_ or _OR_ operators between them. You can also add _OR_ operators on aggregate columns aggregated in the report view.

Once two eligible filters or prompts have been added, **Add advanced logic** appears below the filters. Click **Add advanced logic** to edit the formula using the numbers next to the filters. The _Validate_ button checks the syntax.

_AND_ operations are evaluated before _OR_ operations by default. You can use parentheses to determine which logic is evaluated first.

<div class="note-border alert-info">
  <div class="alert alert-info" role="alert">
    <div><i class="far fa-info-circle"></i></div>
    <div class="alert-text">
      <p><strong>Note</strong>: Filters are locked while editing advanced logic. To modify or delete a filter, remove the advanced logic.</p>
    </div>
  </div>
</div>


### Limitations

The following limitations apply to advanced logic:

  * Some filters are ineligible for advanced logic, and will not have a corresponding number.
  * Dashboard previews are not available for reports with advanced logic.
  * While you can add an _OR_ operator between parent and down views in ladder configuration, you cannot add an operator across multiple down views.
  * Vault does not support advanced logic on Multi-Pass reports with a Union-All report view.
  * Relationship constraint filters are ineligible for advanced logic.

## Example Use Case: Documents with Binders

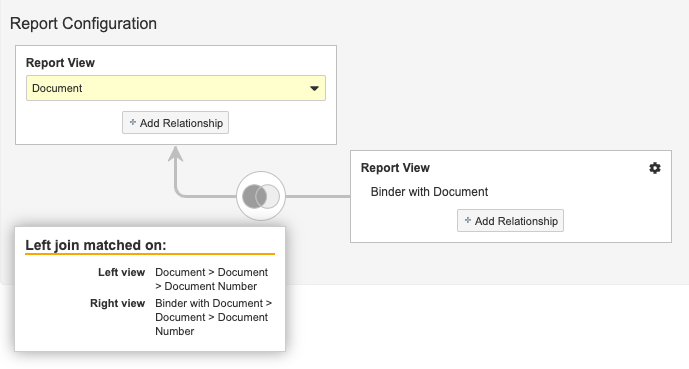
Users may need to identify which documents are not included in binders. To see this, they could create a Multi-Pass report that shows the relevant documents and all binders with documents, which will allow them to determine which documents are not in a binder. This example report type uses a single down relationship.
In this use case, a Multi-Pass report might look like this:

<a href="https://platform.veevavault.help/assets/images/Binder_with_Document_Multipass_Report_20R34.png" data-lightbox="Binder_with_Document_Multipass_Report_20R34.png" data-title="" data-alt="Binder with Document Multipass Report">
  <img class="docimage" src="https://platform.veevavault.help/assets/images/Binder_with_Document_Multipass_Report_20R34.png" alt="Binder with Document Multipass Report" style=""  />
</a>

_Document_ is the primary report view of this Multi-Pass report. It is joined with the _Binder with Document_ report view, which is filtered for blank rows. The report views are matched on the document's _Document Number_ field.

The final report will contain the following records:

*  From the primary view: Every document.
*  From the second view: Every binder containing a document.

## Example Use Case: Impacted Document Report (RIM)

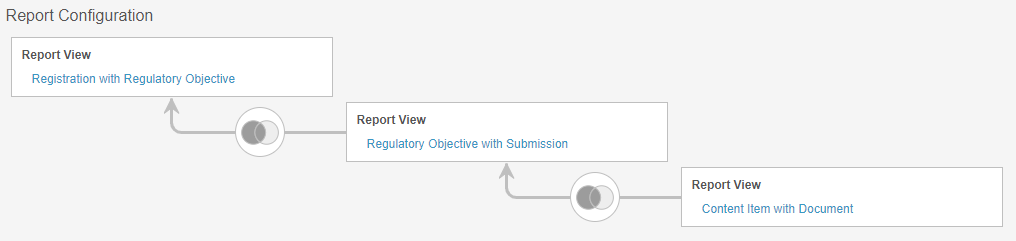
When changes to a registration occur, regulatory information managers need to quickly find all affected documents and take necessary actions. With a Multi-Pass report, they would be able to report on a registration, all related documents, and any other related object that may have been affected by the change. This example chain report type uses multiple left joins.

A Multi-Pass report type to construct such a report might look like this:
<a href="https://platform.veevavault.help/assets/images/impactedDocumentReport-19r13.png" data-lightbox="impactedDocumentReport-19r13.png" data-title="" data-alt="Impacted Document Report">
  <img class="docimage" src="https://platform.veevavault.help/assets/images/impactedDocumentReport-19r13.png" alt="Impacted Document Report" style=""  />
</a>

_Registration with Regulatory Objective_ is the primary view of this Multi-Pass report. It is joined with the _Regulatory Objective with Submission_ view, matched on the _Regulatory Objective_ object's _ID_ field.

The third view, _Content Item with Content Plan and Document_, is joined to the _Regulatory Objective with Submission_ view, matched on the _Submission_ object's _ID_ field and the _Content Plan_ object's _Submission_ reference field.

The final report will contain the following records:

  * From the primary view: Every _Registration_ and _Regulatory Objective_ record.
  * From the second view: _Submission_ records that have a matching _ID_ with one of the _Regulatory Objective_ records from the primary view.
  * From the third view: _Content Plan_ records with _Submission_ field values that match one of the _Submission_ record's _ID_ fields, and the documents related to those _Content Plan_ records.

## Example Use Case: Document Change Controls with Documents (both Released and Obsolesced)

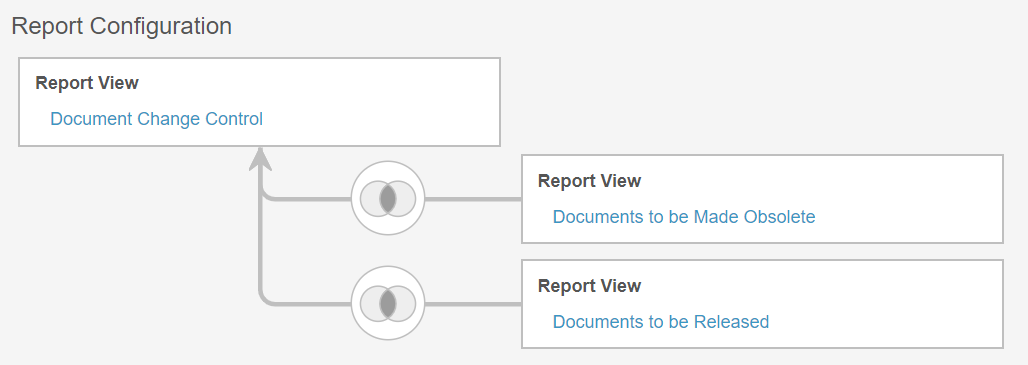
Users may need to identify which _Document Change Controls_ have associated documents that are ready for release, obsolescence, or both. To see this, they could create a Multi-Pass report that shows the relevant _Document Change Controls_ and all related documents. This report will allow them to quickly determine which actions are necessary on each document. This example ladder report type uses multiple down relationships.

In this use case, a Multi-Pass report type might look like this:
<a href="https://platform.veevavault.help/assets/images/MultiPass_Ladder_DCC_19R35.png" data-lightbox="MultiPass_Ladder_DCC_19R35.png" data-title="" data-alt="Document Change Controls Multi-Pass Report">
  <img class="docimage" src="https://platform.veevavault.help/assets/images/MultiPass_Ladder_DCC_19R35.png" alt="Document Change Controls Multi-Pass Report" style=""  />
</a>

_Document Change Control_ is the primary view of this Multi-Pass report. It is joined with two (2) views:

  * The _Documents to be Made Obsolete_ view, matched on the _Document Change Control's ID_ field and the document's _Obsolete Change Control_ field
  * The _Documents to be Released_ view, matched on the _Document Change Control's ID_ field and the document's _Release Change Control_ field

The final report will contain the following records:

  * From the primary view: _Document Change Control_ records which have either a document to be made obsolete or a document to be released.
  * From the _Documents to be Made Obsolete_ view: Documents associated with the _Document Change Control's ID_ value that have a matching _Obsolete Change Control_ value.
  * From the _Documents to be Released_ view: Documents associated with the _Document Change Control's ID_ value that have a matching _Release Change Control_ value.

## Join Types

<table class="wbord">
  <tr>
    <td style="width: 57px;">
      <p>
        <strong>Join</strong>
      </p>
    </td>
    <td style="width: 1130px;">
      <p>
        <strong>Description</strong>
      </p>
    </td>
    <td style="width: 76px;">
      <p>
        <strong>Icon</strong>
      </p>
    </td>
  </tr>
  <tr>
    <td style="width: 57px;">
      <p>
        Left
      </p>
    </td>
    <td style="width: 1130px;">
      <p>
        Vault returns all records from the view on the left side of the relationship and only records with matching fields from the view on the right side of the relationship.
      </p>
    </td>
    <td style="width: 76px;">
      <img class="inline" src="https://platform.veevavault.help/assets/images/multiPassVenn-19r13.png" alt="Left Join Icon" style="" />
    </td>
  </tr>
  <tr>
    <td style="width: 57px;">
      <p>
        Inner
      </p>
    </td>
    <td style="width: 1130px;">
      <p>
        Vault returns records that have matching values from both views.
      </p>
    </td>
    <td style="width: 76px;">
      <img class="inline" src="https://platform.veevavault.help/assets/images/innerJoin-19r23.png" alt="Inner Join Icon" style="" />
    </td>
  </tr>
</table>

### Limitations

Vault does not support join fields if one of the rows contains a comma. We recommend joining by _ID_ to prevent errors. However, if you must join on the field with a comma, you can create a formula field using the `substitute()` function to remove the comma.

 [2]: #group-rows
