# Configuring Collaborative Authoring


<div class="note-border alert-info">
  <div class="alert alert-info" role="alert">
    <div><i class="far fa-info-circle"></i></div>
    <div class="alert-text">
      <p><strong>Note</strong>: This article describes the process for configuring collaborative authoring for new customers or in new Vaults. For customers that configured collaborative authoring prior to 25R1 using the legacy configuration, we recommend that you migrate from the legacy configuration to the enhanced configuration. See <a href="/en/gr/79636601/">Migrating from Legacy to Enhanced Collaborative Authoring Configuration</a>
 for more information.</p>
    </div>
  </div>
</div>


Collaborative authoring connects Vault to Microsoft 365 to allow multiple users to edit a document at the same time using the Microsoft 365 desktop software or browser apps. Collaborative Authoring can be used with Microsoft Word (\*.docx), Excel (\*.xlsx and \*.xlsm), and PowerPoint (\*.pptx) documents.

See <a href="/en/gr/1032791/">FAQ: Collaborative Authoring</a>
 for a list of frequently asked questions related to using collaborative authoring.

## Configuration Overview {#overview}

To configure collaborative authoring as a new customer or in a new Vault, you need to:

* Have a Microsoft 365 tenant.
* Use the provided [PowerShell script][2] to:
  * Register your Vault as an Entra ID application.
  * Create a dedicated SharePoint team site and grant the Entra ID application access to manage the site.
  * Secure the SharePoint team site.
* Optional: [Configure Microsoft 365 for external collaboration][3].
* [Connect your Vault to your Microsoft 365 account][4].
* Optional: [Configure collaborative authoring workflows][5] and @mention functionality.
* Optional: [Configure notifications][7] for collaborative authoring workflow actions.
* Ensure collaborative authoring users have the appropriate [permissions][8].


### Demo: Configuring Collaborative Authoring {#demo-configuring-collaborative-authoring}


The following video demonstrates how to configure collaborative authoring for new customers or new Vaults:
<video controls width=860 height =504 poster="https://platform.veevavault.help/assets/images/posters/2026-configuring-collaborative-authoring.png" preload="metadata">
    <source src="https://platform.veevavault.help/108e9b1d-559c-4d48-918b-1e4c5b5a533c/1118320e-9d40-43fe-b9be-ece52f5d888b/1118320e-9d40-43fe-b9be-ece52f5d888b_source__v.mp4" type="video/mp4" >
    
    <track
    label="English"
    kind="subtitles"
    srclang="en"
    src="/en/gr/assets/captions/25r3-configuring-collaborative-authoring-v3.vtt"
    default />
    </video>

<a href="/en/gr/676810/">Details</a>


## Configuring Microsoft 365 Using the PowerShell Script {#configure-microsoft-using-powershell}

<div class="note-border alert-info">
  <div class="alert alert-info" role="alert">
    <div><i class="far fa-info-circle"></i></div>
    <div class="alert-text">
      <p><strong>Note</strong>: Complete this configuration in a command line interface as the SharePoint team site <em>Owner</em>.</p>
    </div>
  </div>
</div>


We have provided a [PowerShell script][9] (`collab_auth_setup_script.ps1`) to simplify the process of configuring the necessary updates in Entra ID and SharePoint. While many of the updates can be done without PowerShell, granting the Entra ID application Write access to the SharePoint site can only be done using PowerShell or the Graph API. We have incorporated all steps into the PowerShell script to ensure all steps are done correctly. See the PowerShell script's included README for detailed information about running the script.

The script performs the following actions:

* Creates a temporary admin application in Entra ID with the _AllSites.FullControl_ permission to be used to grant the necessary permissions. This application is deleted automatically when the script completes.
  * All permissions must be granted admin consent
* Creates an Entra ID application for Vault to use and apply the necessary API permissions, including:
  * _Sites.Selected_ permission (required)
  * Optional for automatic external user invites: _Directory.ReadWrite.All_ and _User.Invite.All_
  * Optional for automatic adding of participants during workflows: _User.Read.All_
  * The above permissions are application permissions for Microsoft Graph
* Creates a SharePoint site.
* Applies security hardening to the SharePoint site to prevent non-admin access to the site directly in SharePoint.
  * Disables member sharing. Only site owners will be allowed to share files, folders, and the site.
  * Disables requesting access to the site and the site's files.
  * Disables deleting files for members with the Contribute permission level.
  * Removes member and visitor groups from the documents library. Only the owner group will have default access.
* Grants the Entra ID application _Write_ permission to the SharePoint site (using the app's _Sites.Selected_ permission).


<div class="note-border alert-info">
  <div class="alert alert-info" role="alert">
    <div><i class="far fa-info-circle"></i></div>
    <div class="alert-text">
      <p><strong>Note</strong>: The script will prompt for authentication and consent multiple times. See <a class="download-link " href="https://platform.veevavault.help/assets/downloads/CollaborativeAuthoring_PowerShell_Script_Inputs_Apr2026.pdf" target="_blank" rel="noopener">this document<i class="fa fa-download" aria-hidden="true"></i></a> for details and screenshots about what information the PowerShell script prompts for.</p>
    </div>
  </div>
</div>


## Configuring Microsoft 365 for External Collaboration {#configure-external-collaboration}

<div class="note-border alert-info">
  <div class="alert alert-info" role="alert">
    <div><i class="far fa-info-circle"></i></div>
    <div class="alert-text">
      <p><strong>Note</strong>: Complete this configuration in <em>SharePoint Admin Center</em> as a SharePoint global admin.</p>
    </div>
  </div>
</div>


External users are collaborators with email addresses from different domains. In order to use collaborative authoring with external users, you must enable automatic invitations through Entra ID in your Vault. Once automatic invitations are enabled, Vault sends external users an email invitation when they click _Edit_ to start or join a collaborative authoring session, automatically adding them to the session. External users can then join or start the session by clicking _Edit_. External users do not need to accept the email invitation to collaborate and join a session.

To enable automatic invitations in Microsoft 365:

1. Ensure your app registration has the _Directory.ReadWrite.All_ and _User.Invite.All_ permissions with admin consent granted.
2. Enable external collaboration at a SharePoint tenant level:
   1. Log into _Office365 Admin Center_.
   2. Navigate to _SharePoint Admin Center_.
   3. Under _Policies_, click **Sharing**.
   4. In the _External sharing > Content can be shared with_ section, allow for sharing with external users by selecting an option other than **Only people in your organization**.
3. Enable external collaboration at the site collection level:
   1. In _SharePoint Admin Center_, click **Active Sites**.
   2. Locate your Vault's site.
   3. Select the **Policies** tab.
   4. Click **Edit** in the _External Sharing_ section.
   5. In the _External sharing > Content can be shared with_ section, allow for sharing with external users by selecting an option other than **Only people in your organization**.

## Connecting Your Vault to Your Microsoft 365 Account {#connect-vault-to-microsoft}

<div class="note-border alert-info">
  <div class="alert alert-info" role="alert">
    <div><i class="far fa-info-circle"></i></div>
    <div class="alert-text">
      <p><strong>Note</strong>: Complete this configuration in Entra ID as an Entra ID admin, and in Vault as a <em>System Administrator</em> or <em>Vault Owner</em>.</p>
    </div>
  </div>
</div>


Once you have [configured Microsoft 365 to work with Vault][2], you must connect your Vault to your Microsoft 365 account.

To connect your Vault to Microsoft 365 in Entra ID:

1. In Entra ID, on the application page for the app registration for your Vault, click **Certificates & Secrets**.
2. Create a new client secret and ensure that you record the **Value**. This value only remains visible for a few minutes.

To connect your Vault to Microsoft 365 in Vault

1. In your Vault, navigate to **Admin > Settings > Checkout Settings** and click **Edit** in the _Collaborative Authoring with Microsoft Office_ section.
2. Fill in the following fields:
   * **Directory (tenant) Id**: The automatically-generated **Tenant ID** listed on the _App Overview_ page of the Vault application you created in Entra ID.
   * **Application (client) Id**: The automatically-generated **Client ID** listed on the _App Overview_ page of the Vault application you created in Entra ID.
   * **Client Secret**: The client secret **Value** generated in Step 2.
   * **Collaboration Drive**: The **URL** to the _Documents_ folder on the SharePoint team site you created. This URL should end in _/Shared%20Documents_. You do not need to include _/Forms/AllItems.aspx_.
3. Optional: Select the **Auto Invite External Users** checkbox if you [configured Microsoft 365 for external collaboration][3].
4. Click **Authorize**. When the checkout settings are authorized, the _Integration Status_ is displayed as _Verified_.
5. Click **Save**.

## Configuring Collaborative Authoring Workflows in Vault {#configure-workflows}

<div class="note-border alert-info">
  <div class="alert alert-info" role="alert">
    <div><i class="far fa-info-circle"></i></div>
    <div class="alert-text">
      <p><strong>Note</strong>: Complete this configuration in Vault as a <em>System Administrator</em> or <em>Vault Owner</em>.</p>
    </div>
  </div>
</div>


You can use workflow and lifecycle actions to automatically start, end, and cancel collaborative authoring sessions from a document workflow. The actions include:

* _Check Out to Microsoft Office_
* _Check In From Microsoft Office_
* _Cancel Editing in Microsoft Office_

To configure collaborative authoring actions on a workflow, you must add a _System Action_ step. The _System Action_ drop-down displays each action for you to select. You can also configure these actions as entry actions on document lifecycle states. These actions are available in workflow configuration by default, but you cannot activate workflows containing one or more of these actions if your Vault is not configured and verified for collaborative authoring.

When the workflow enters a lifecycle state or workflow step configured with one of these actions, Vault immediately executes it for any document in the workflow. For example, if the _In Authoring_ state is configured with the _Check Out to Microsoft Office_ entry action, Vault checks any documents in the workflow out to Microsoft 365 as soon as the workflow enters _In Authoring_.

Vault always considers the Workflow Owner as the user who executes collaborative authoring actions. It is recommended that you include both the _Check Out to Microsoft Office_ and _Check in From Microsoft Office_ actions in the collaborative authoring workflow configuration as it ensures the Workflow Owner checks in and checks out documents. If only one of these actions is included, it could cause issues in the workflow.

For example, if a user other than the Workflow Owner clicks _Edit in Microsoft Office_ from the _Actions_ menu, and a _Check in From Microsoft Office_ action is configured on the _System Action_ step or as a lifecycle entry action later in the workflow, an error will occur when the check in executes. This error happens because the Workflow Owner did not check the document out. The user who checks out and checks in the document must be the same. In addition, the Workflow Owner must have _Edit_ permission on the lifecycle state configured with the collaborative authoring action.

If a document is already checked out when the collaborative authoring action runs or checked in before the workflow is complete, Vault will take no collaborative authoring action.


<div class="note-border alert-info">
  <div class="alert alert-info" role="alert">
    <div><i class="far fa-info-circle"></i></div>
    <div class="alert-text">
      <p><strong>Note</strong>: You can configure these actions as <a href="/en/gr/50498/#cancelation-actions">cancellation actions</a>
. If configured, the Workflow Owner will receive a notification for each document in the workflow upon cancellation.</p>
    </div>
  </div>
</div>


### Automatic Mentioning in Workflows {#automatic-mentioning-in-workflows}

When using the automatic check-out option with a workflow, users can tag workflow participants in Microsoft Office files using the @mention functionality, without authors needing to open the document in collaborative authoring first.

To enable automatic mentioning, ensure your Entra ID application has the [_User.Read.All_ permission][2]. Vault uses this permission to give workflow participants _Write_ access to the checked out documents.

Vault can also grant new workflow participants the necessary permissions to be tagged with the <a href="/en/gr/56842/#collaborative-authoring-workflows">@mention</a>
 functionality when added as part of the _Add Participants_ action or when added as a task owner through task reassignment.

When configuring the workflow, ensure that your workflow participants are being granted the [necessary permissions in Vault][8] to participate in collaborative authoring before the _Check Out to Microsoft Office_ step.

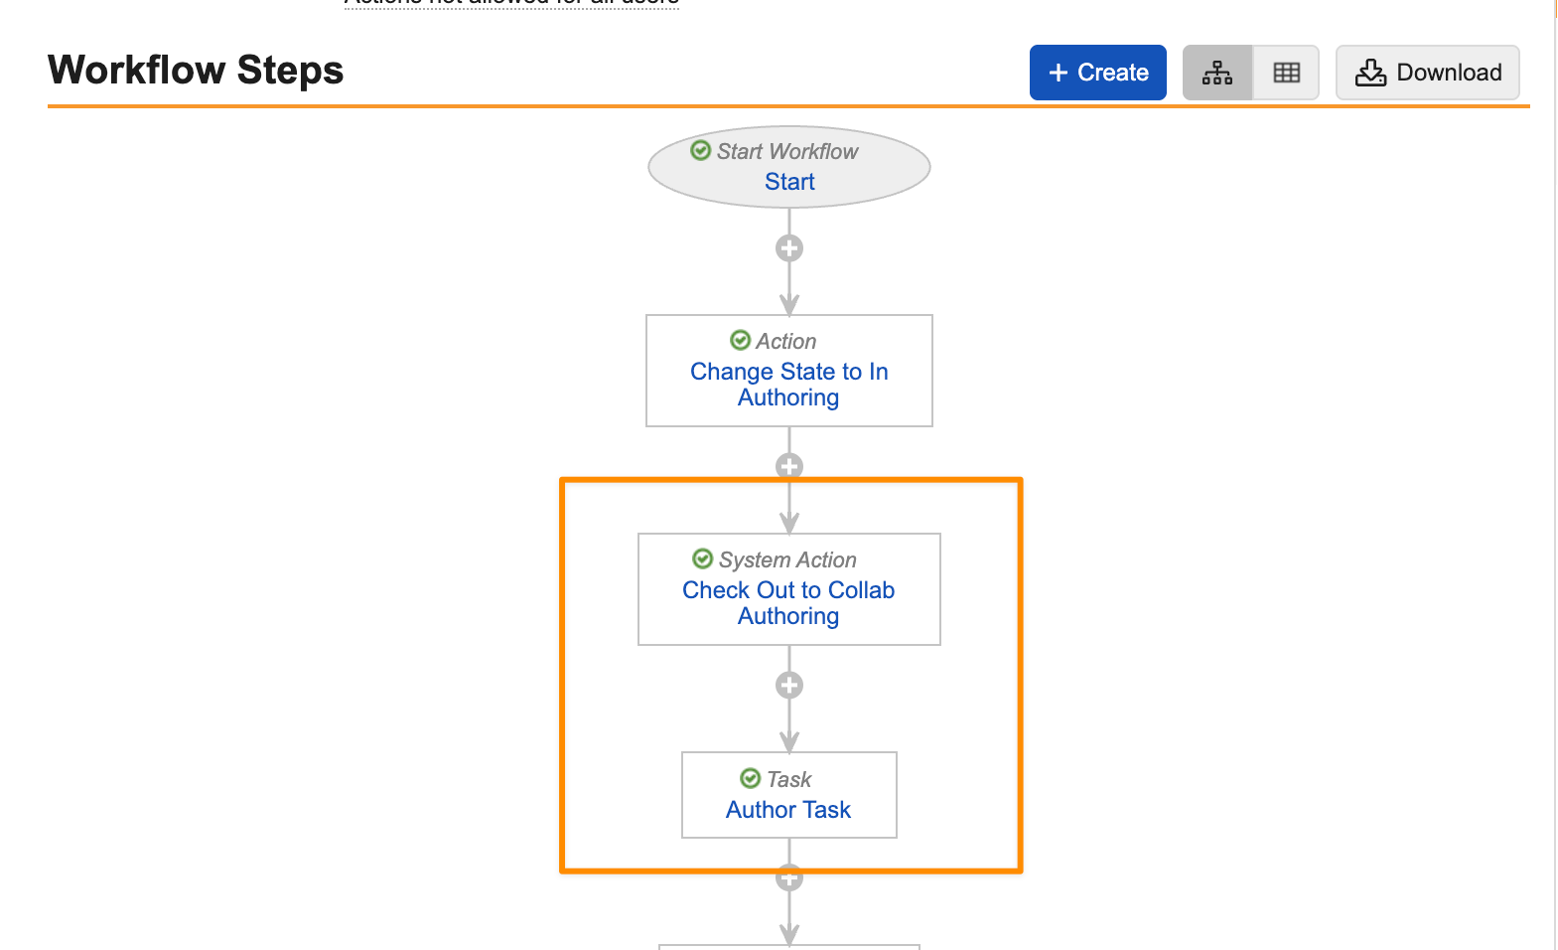
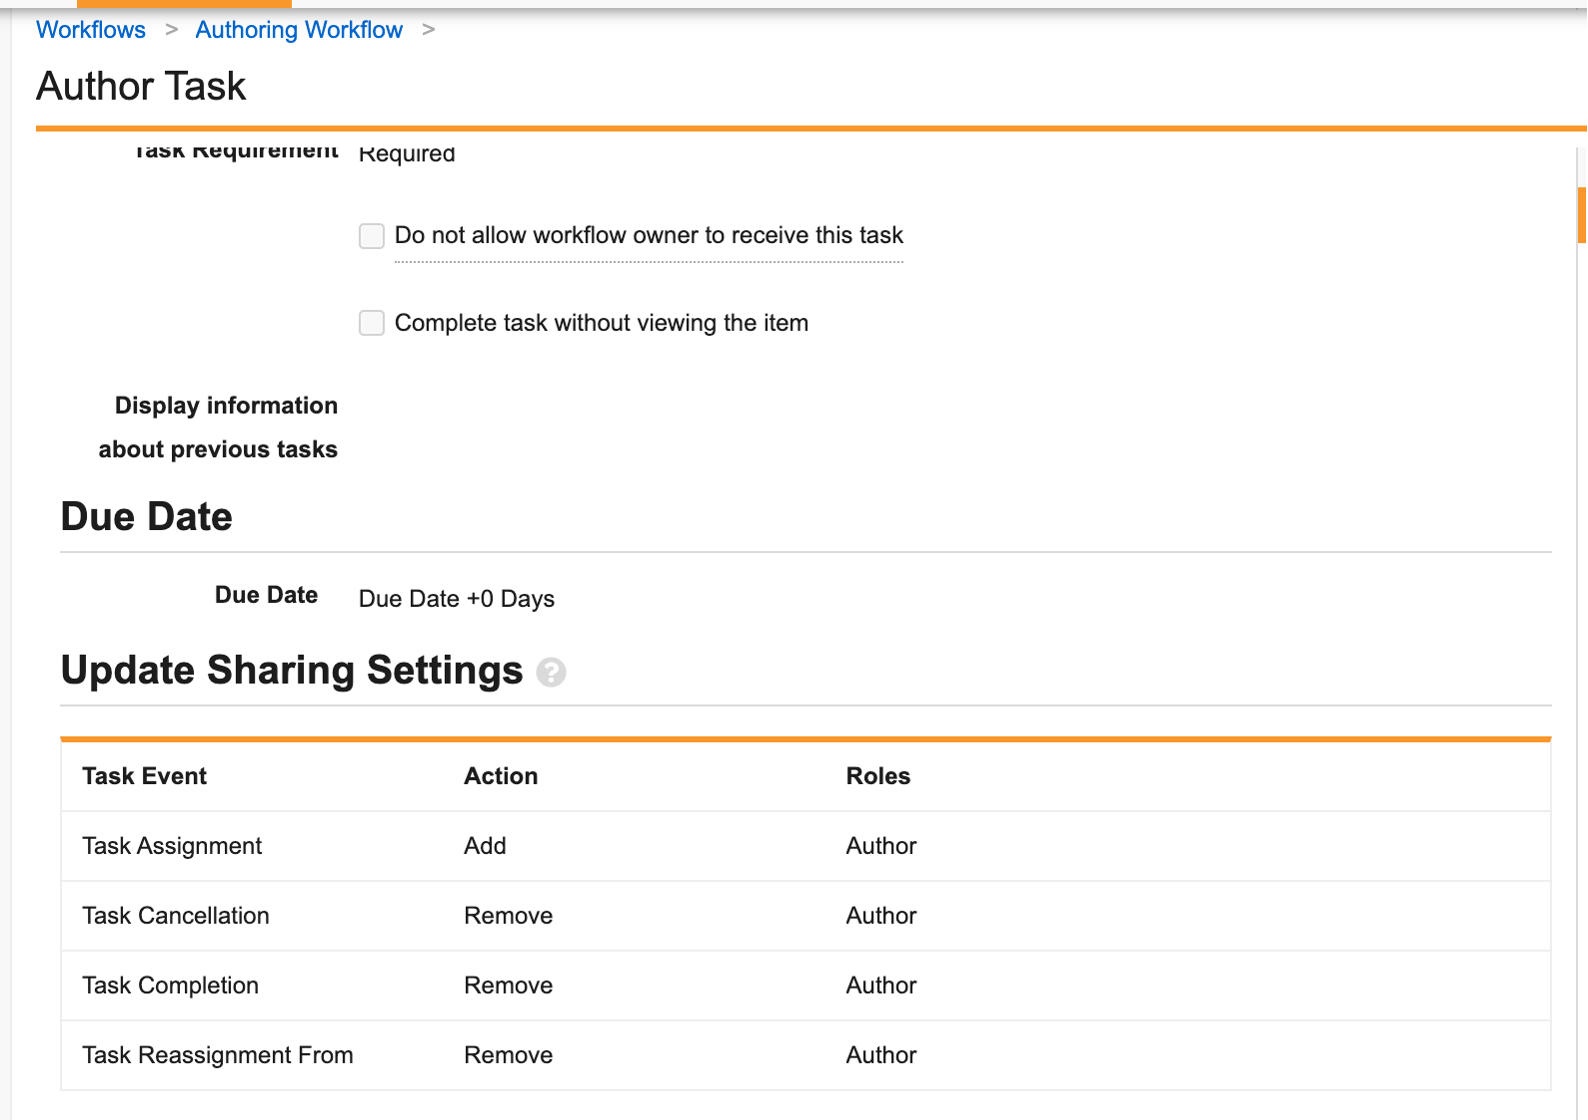
For instance, if your workflow adds participants to the _Author_ role as part of the Task step, and that Task step comes after the _Check Out_ action, Vault may fail to grant participants _Write_ access due to Vault permissions being granted after checkout completes. The following examples demonstrate an improperly configured workflow:

<a href="https://platform.veevavault.help/assets/images/platform_collaborative_authoring_automatic_mentioning_workflows_1.png " data-lightbox="platform_collaborative_authoring_automatic_mentioning_workflows_1.png " data-title="" data-alt="Automatic mentioning in workflows">
  <img class="docimage" src="https://platform.veevavault.help/assets/images/platform_collaborative_authoring_automatic_mentioning_workflows_1.png " alt="Automatic mentioning in workflows" style="max-width: 500px;"  />
</a>

<a href="https://platform.veevavault.help/assets/images/platform_collaborative_authoring_automatic_mentioning_workflows_2.png " data-lightbox="platform_collaborative_authoring_automatic_mentioning_workflows_2.png " data-title="" data-alt="Automatic mentioning in workflows">
  <img class="docimage" src="https://platform.veevavault.help/assets/images/platform_collaborative_authoring_automatic_mentioning_workflows_2.png " alt="Automatic mentioning in workflows" style="max-width: 500px;"  />
</a>

### Workflow Limitations

The following limitations apply to using collaborative authoring workflows:

* When adding workflow participants during the _Check Out to Microsoft Office_ workflow action, Vault can only grant access to up to 15 participants for automatic mentioning. When more than 15 participants are included, none of them will be available for automatic mentioning.
* Microsoft 365 does not support @mentioning external users (users who are not part of your organization's directory).
* Vault supports automatic mentioning through workflows only. If a workflow is not used, users can only be mentioned in the file after they have opened the document in collaborative authoring.
* Users must have [permissions in Vault][8] to participate in collaborative authoring before the _Check Out to Microsoft Office_ workflow step.
* When a collaborative authoring action is executed through a _System Action_ step, the audit trail displays _System_ as the Workflow Owner.
* If the Workflow Owner changes while a document is checked out, the new Workflow Owner must be a _Vault Owner_ or have the _All Document Actions_ permission to check the document in.
* Vault executes the collaborative authoring actions asynchronously. Users may need to refresh their browser if the action's results do not immediately appear on screen.
* Vault encounters an error if the <a class="external-link " href="https://learn.microsoft.com/en-us/office365/servicedescriptions/sharepoint-online-service-description/sharepoint-online-limits" target="_blank" rel="noopener">SharePoint unique permission limit<i class="fa fa-external-link" aria-hidden="true"></i></a> of 50,000 is reached. Ensure documents where users have _Edit_ permission are checked back in after collaborative authoring is complete to avoid encountering this error.

## Configuring Notifications for Workflow Actions in Vault {#configuring-notifications}

<div class="note-border alert-info">
  <div class="alert alert-info" role="alert">
    <div><i class="far fa-info-circle"></i></div>
    <div class="alert-text">
      <p><strong>Note</strong>: Complete this configuration in Vault as a <em>System Administrator</em> or <em>Vault Owner</em>.</p>
    </div>
  </div>
</div>


Admins can configure a summary notification to be sent out upon completion of a collaborative authoring workflow action. If the action is configured on a System Action step, the notification is sent to the Workflow Owner. If the notification is configured on an entry action, a notification is sent to the user who initiated the state change. Select one of the following options from the **Send Notification upon (action) Completion** drop-down:

* **Always**: A notification is always sent after the action completes.
<div class="note-border alert-info">
  <div class="alert alert-info" role="alert">
    <div><i class="far fa-info-circle"></i></div>
    <div class="alert-text">
      <p><strong>Note</strong>: We recommend you use the <strong>Always</strong> option during initial configuration testing.</p>
    </div>
  </div>
</div>


* **Only upon failure**: A notification is sent if the action fails.
* **Never**: A notification is never sent for the action.

The notification includes the following information about each document in the workflow:

* Total number of documents that failed and succeeded
* Name of the specific action
* Date and time in your Vault's time zone the action started
* Collaborative authoring session duration in hours, minutes, and seconds

The total number of failed and successful documents displays as a link that downloads the results to a CSV file. Use this file to view additional information, such as error descriptions when an action fails.

## Related Permissions {#permissions}

To participate in collaborative authoring, users require the indicated permissions for the following functionality:

<table>
  <tr>
      <th>Functionality</th>
      <th>Required Permissions</th>
  </tr>
  <tr>
      <td>Edit a Document using Collaborative Authoring</td>
      <td>Users with the <em>Edit Document</em> role-based permission can click <strong>Edit</strong> or <strong>All Actions > Edit in Microsoft Office</strong> to edit a document using collaborative authoring.</td>
  </tr>
  <tr>
      <td>Check In</td>
      <td>The user who started the collaboration session, the Document Owner, <em>Vault Owners</em>, and users with the <em>All Document Actions</em> permission can click <strong>Check In</strong> to check in a document and end the collaboration session.</td>
  </tr>
  <tr>
      <td>Save to Vault</td>
      <td>Users with the <em>Edit Document</em> role-based permission can click <strong>Save to Vault</strong> to save their document edits to Vault without checking in the document or ending the collaboration session.</td>
  </tr>
  <tr>
      <td>Cancel Editing</td>
      <td>The following users can click <strong>Cancel Editing</strong> to cancel a collaboration session, discard unsaved edits, and end the session for all users:
          <ul>
              <li>The Document Owner (requires the <em>Edit Document</em> role-based permission)</li>
              <li>The user who started the collaboration session (requires the <em>Edit Document</em> role-based permission)</li>
              <li>A user with both the <em>Edit Document</em> role-based permission and the <em>Application: Document: Cancel Checkout</em> permission</li>
              <li><em>Vault Owners</em> or users with the <em>All Document Actions</em> permission</li>
          </ul>
      </td>
  </tr>
  <tr>
      <td>View the Collaborative Authoring Error Log</td>
      <td>Users with the <em>Admin: Logs: Collab Auth Error Logs</em> permission can view the <a href="/en/gr/76814/">Collaborative Authoring Error Log</a>
.</td>
  </tr>
</table>  

## Appendix

### PowerShell Configuration Scripts {#powershell-script}

We have provided several PowerShell scripts to streamline several aspects of the collaborative authoring configuration process. Download the <a class="external-link " href="https://platform.veevavault.help/assets/downloads/CollaborativeAuthoringSetup-v5.zip" target="_blank" rel="noopener">SharePoint Site Management .ZIP file<i class="fa fa-external-link" aria-hidden="true"></i></a>, which contains the following files:

* **README**: This text file describes the purposes of each script, the variables you need to update in each script, and how to run the scripts. Ensure that you read the README before running the scripts.
* **`collab_auth_setup_script.ps1`**: This script performs the actual updates in Entra ID and SharePoint. You can use this script for new setups and for migrating from the legacy configuration.

See <a class="download-link " href="https://platform.veevavault.help/assets/downloads/CollaborativeAuthoring_PowerShell_Script_Inputs_Apr2026.pdf" target="_blank" rel="noopener">this document<i class="fa fa-download" aria-hidden="true"></i></a> for details and screenshots about what information the PowerShell script prompts for.

[1]: #overview
[2]: #configure-microsoft-using-powershell
[3]: #configure-external-collaboration
[4]: #connect-vault-to-microsoft
[5]: #configure-workflows
[6]: #automatic-mentioning-in-workflows
[7]: #configuring-notifications
[8]: #permissions
[9]: #powershell-script