# Using Document Workflows

Document workflows allow you to send one or more documents out for a wide variety of processes, such as review and approval, with up to 100 documents on a single workflow instance. This article explains how to start document workflows, manage in-progress workflows, and complete tasks as a participant. See [About Document Workflows](/en/lr/50493/) for general information.


### Navigating Tasks & Workflows {#navigating-tasks-workflows}


This video demonstrates how to start document workflows and complete tasks as a particpant:
<video controls width=860 height =504 poster="https://platform.veevavault.help/assets/images/posters/2025-navigating-tasks-and-workflows.png" preload="metadata">
    <source src="https://platform.veevavault.help/108e9b1d-559c-4d48-918b-1e4c5b5a533c/abd590dd-f581-42b5-a108-1df5aebc0404/abd590dd-f581-42b5-a108-1df5aebc0404_source__v.mp4" type="video/mp4" >
    
    <track
    label="English"
    kind="subtitles"
    srclang="en"
    src="/en/lr/assets/captions/24r3-navigating-tasks-workflows.vtt"
    default />
    </video>

[Details](/en/lr/676796/)


## Starting a Workflow for a Single Document {#single-document}

To start a workflow for a single document:

  1. From the Library or document tabs, select the workflow start action from an individual document's **Actions** menu.
  2. Vault displays the workflow start dialog with all of the required information and fields to start the workflow. Provide the required information and click **Start**. See [below][12] for details on assigning users.
  3. From a document report's **Actions** menu

You cannot start a document workflow if the selected document is already in an active workflow.

## Starting a Workflow for Multiple Documents {#multiple-documents}

You can start a document workflow from the [Library or document tabs][2], [Cart][3], [document reports](/en/lr/3614/#How-to-start-workflows-from-reports), or from a [binder section][4]. 

To start a workflow for multiple documents:

  1. From the **Actions** menu, select **Start Workflow**. You can include up to 100 documents in the workflow.
  2. Conditional: If there are no workflows that are active and valid for all of the selected documents, Vault redirects you to the [_Advanced Start Workflow_][15] page.
  3. In the **Start Workflow** dialog, select a specific workflow from the **Document Workflow** drop-down. Vault only displays workflows that are active and valid for the selected documents.
  4. Optional: Click [**Advanced Start Workflow**][15] for additional multi-document workflow options.
  5. Click **Continue**.
  6. If prompted, provide a **Description**. Vault uses this value as the _Name_ for the _Envelope_ record. If the value is not editable, an Admin has configured the workflow to use auto-naming for _Envelope_ records.
  7. Assign users and groups to roles. See below for details on [assigning users][12].
  8. Fill in any required field values or variables.
  9. Click **Start**.

Some document workflows are only available on specific document lifecycle states. Some document workflows are restricted to a [single document only][6].

<div class="note-border alert-info">
  <div class="alert alert-info" role="alert">
    <div><i class="far fa-info-circle"></i></div>
    <div class="alert-text">
      <p><strong>Note</strong>: This process does not start individual workflows for each document, but rather one workflow for all selected documents.</p>
    </div>
  </div>
</div>


### Starting Workflows from the Library & Document Tabs {#library}

When starting a document workflow from the Library or a document tab, Vault includes all documents in your current view. For example, if you start a workflow from _Favorites_, Vault will include all documents within your favorites in the document workflow. If you perform a search or apply filters before starting the workflow, Vault includes only the matching documents.

### Starting Workflows from the Cart {#cart}

When starting a document workflow from the Cart, Vault includes all documents in your cart. This allows you to select the documents you wish to include in the document workflow envelope.

### Starting Workflows from Binders {#binders}

When starting a workflow from a binder, workflow tasks and verdicts apply to the binder itself and not its contents. If the workflow allows for multiple verdicts, each binder included in the workflow receives only one verdict. Vault provides a link to view binder contents on the task page, as you cannot view binder contents within the workflow viewer.

### Starting Advanced Workflows {#advanced-start-workflow-doc}

The _Advanced Start Workflow_ option allows you to select documents to include in a workflow based on the workflows available in the document's lifecycle state. You can use this option to break up large amounts of documents into smaller subsets to send on their own workflows. Or, you can bulk move documents through state changes and action steps when no tasks exist on a workflow. A **Finish + Start Next Workflow** is available in this scenario to help you cycle through each workflow for the subset of documents.

_Advanced Start Workflow_ is also available in the _Start Next Workflow_ dialog for workflows configured with _Display start next workflow dialog_ when workflow ends on the _End_ step. This action initiates a new multi-document workflow that includes all documents, remaining and removed, from the original workflow that just ended.

To use the _Advanced Start Workflow_ options:

 1. Click **Advanced Start Workflow** in the **Start Workflow** dialog. All documents in the view are included.
 2. Optional: Unselect documents to exclude from the workflow on the **Refine Selection** page.
 3. Click **Next**.
 4. On the **Choose Workflow** page, select the workflow to apply to your selected documents. This page displays each lifecycle and lifecycle state based on the selected documents. Available workflows are grouped under each lifecycle state. Each state displays the number of selected documents in the state and available for inclusion in the workflow.
 5. Click **Next**.
 6. On the **Edit Details** page, edit workflow _Start_ step details, such as the description, roles, and due date. If no _Start_ step is configured on the workflow, skip this step.
 7. Click **Next**.
 8. A confirmation summary displays the workflow details and documents included in the workflow. Review and click **Finish** to start the multi-document workflow. 
 9. Optional: If changes are needed, click **Back** to return to a previous step and make edits. Vault saves your previous selections.
 10. Optional: Click **Finish + Start New Workflow** to return to the **Refine Selection** page. Repeat the process for any documents not included in the original workflow.

Vault returns you to the initial view where the workflow was started and displays a green banner at the top of the page with a success notification.

<div class="note-border alert-info">
  <div class="alert alert-info" role="alert">
    <div><i class="far fa-info-circle"></i></div>
    <div class="alert-text">
      <p><strong>Note</strong>: If the view contains over 1,000 documents, Vault adds the first 1,000 to the <strong>Refine Selection</strong> page. To ensure the documents you want are included in the <strong>Refine Selection</strong> page, use a filter to refine your view and include other documents.</p>
    </div>
  </div>
</div>


### Starting Workflows from a Binder Section {#binder-section}

When starting a document workflow from a binder section, Vault includes all documents in that particular section.


### Document Workflow Limitations

You cannot start a document workflow in the following situations:

* If any of the selected documents is already in an active workflow. [Auto-start document workflows](/en/lr/641589/) bypass this limitation, which allows a document to exist in multiple active workflow instances.
* If there are more than 100 documents selected
* If a document workflow is associated with a specific lifecycle, the workflow may only allow documents in a certain state or with certain fields configured. You will not be able to start the workflow if one or more documents don't meet the specified conditions

## Adding Participants {#adding-participants}

When starting a workflow, the start dialog prompts you to assign users to participant groups, which are then responsible for workflow tasks. Depending on the workflow configuration, Vault may assign tasks to each participant in a group or assign a single task as an "available task". With an available task, one of the users in the participant group must "accept" the task. The user who accepts the task becomes the task owner.

### How to Assign Users

To assign users:

1. Select the checkbox next to each participant group to which you would like to assign the task. Participant groups with asterisks are required.
2. Select participants for each participant group. You can select users and user groups from the drop-down list or enter the name or email address of each participant. If more than 100 users and user groups are available, you may need to type the user/group name to find the participants you need.
3. Optional: If an Admin has enabled the [_Allow workflow initiator to select assign to all or make available_](/en/lr/50498/#task-assignments-docs) control, you can assign the task to or make the task available to all users in the participant group.

<div class="note-border alert-info">
  <div class="alert alert-info" role="alert">
    <div><i class="far fa-info-circle"></i></div>
    <div class="alert-text">
      <p><strong>Note</strong>: If the workflow configuration uses the <em>Roles allowed to participate</em> setting, you can only select a user if that user is in one of the defined roles on each document in the envelope.</p>
    </div>
  </div>
</div>


### Assignment Restrictions

In some workflows, Admins configure constraints for a participant group based on roles. For example, only users who have the _Approver_ role on all workflow content documents would be available when assigning the _Approver_ participant group task. Vault automatically filters to only show allowed users and user groups.

Some workflow configurations restrict task owners from receiving the task.

### How to Add Participants to an Active Workflow

Once the workflow has started, you can still [add participants](/en/lr/1920/) to the workflow using the workflow's _Actions_ menu. To do this, you must have the correct access on all documents in the workflow.

If a workflow uses the _Allow workflow initiator to select assign to all or make available_ control in the _Start_ step, you cannot change the assignment type when adding participants. Vault assigns required and optional tasks to new participants, unless the task is available to any user and has already been accepted.

### Limits

When assigning users or user groups to a participant group, by default, you cannot select more than 5,000 users. However, an Admin can configure a limit on the number of users that can be assigned to a workflow participant control. If this limit is exceeded, you will encounter an error upon assigning a user. This limit applies when assigning users at the start of a workflow and when the workflow is active.

## Viewing Workflow Participants {#view-participants}

Workflow owners and participants can view all workflow participants via the _View Participants_ action. This action is available from the _Actions_ menu in the [Timeline View](/en/lr/50506/#timeline-view), [Active Workflows](/en/lr/879/#ActiveWorkflowsView) list, the [lifecycle stages chevron](/en/lr/9753/#lifecycle-stages-banner), and the _Actions_ column in [document workflow history reports](/en/lr/3168/#view-workflow-history-report). This action is also only available to users with access to Timeline Views, the active workflows list, and the _Application: User: View User Information_ permission.

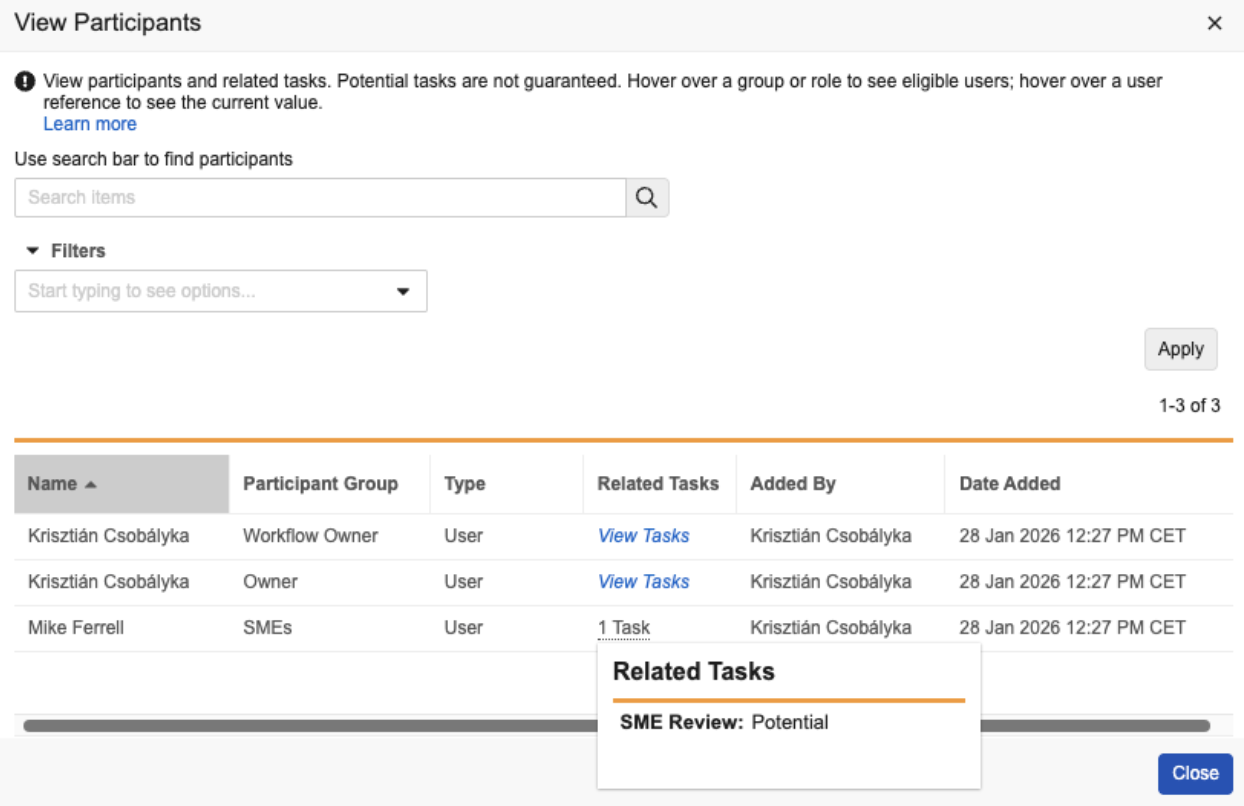
The _View Participants_ action opens a dialog that displays a row for each participant in the workflow including columns for their participant group, participant type, related tasks, the user who added them, and the date and time they were added. Each user, user group, role, or user reference field defined in the Participants control or added to the workflow via the _Add Participant_ action is displayed as an individual participant row.

### Participant Types

Participants can fall under the following types:

* **User**: Refers to all Vault users including the workflow owner. The text "Inactive" displays next to the user's name if they are inactive. The text "No Workflow Access" displays next to users without the [_Application: Workflow: Participate_](/en/lr/22824/#applicationpermissions) permission.
* **Role**: Refers to users added to the workflow via the _Use roles as participants_ control.
* **Group**: Refers to Vault user groups added to the workflow.
* **User Reference Field**: Refers to users added to the workflow via the _Use user reference field as participant_ control.

Hover over a role, group, or user reference field in the _Name_ column to display the users currently in the role, group, or user reference field value. This hovercard displays current users in the role, group, or user reference field at the time of viewing the hover card. Inactive users and users without the _Application: Workflow: Participate_ permission are excluded from the hovercard. Hover cards are not available for completed or cancelled workflows.

### Related Tasks

Click **View Tasks** in the Related Tasks column to view the number of tasks related to a participant. Hover over the number to view the task label and status:

* **Completed**: Refers to completed and canceled tasks instances, and _Task_ steps that were active when a workflow is canceled.
* **Active**: Refers to assigned or available, active tasks.
* **Potential**: Refers to _Task_ steps in the workflow configuration that are assigned to a participant group but have not been reached yet in the workflow process execution. In some cases, the workflow may never reach Potential tasks due to workflow business logic. Potential tasks are only based on the workflow configuration and not the workflow execution logic.

<a href="https://platform.veevavault.help/assets/images/25R3.4-view-workflow-participants-dialog.png" data-lightbox="25R3.4-view-workflow-participants-dialog.png" data-title="" data-alt="View Workflow Participants Dialog">
  <img class="docimage" src="https://platform.veevavault.help/assets/images/25R3.4-view-workflow-participants-dialog.png" alt="View Workflow Participants Dialog" style="width: 400px;"  />
</a>

## Understanding Workflow Segregation of Duties

Your Admin may configure Segregation of Duties policies on the workflow. If so, you must be aware of some considerations when completing the workflow, such as when starting the workflow, adding workflow participants, and completing tasks.

### Starting the Workflow

The workflow will fail to start if Segregation of Duties policies are in place and the following scenarios occur:
* A single user is added to multiple participant groups with assigned tasks in the start step dialog
* A single user or user group is added to a participant group with assigned tasks and the user's role is restricted from completing tasks in the workflow
* A participant group in the start step is missing users due to the workflow not assigning tasks to users because of the Segregation of Duties policies

### Completing Tasks

Vault will apply restrictions to the workflow tasks depending on the Segregation of Duties policies in place. See below for considerations when Segregation of Duties are in place:

* **Task Assignment**: The workflow will not assign multiple tasks to each user or user group or users with a restricted role upon activation.
* **Task Reassignment**: You cannot reassign a task to a user who is already assigned or completed a task or configured with a restricted role. However, you can reassign a user continuing iterations of the same task if _Users in this workflow can only complete one task_ is enabled.
* **Task Acceptance**: Vault will prevent a user from accepting a task if they've already accepted, assigned, or completed another task or configured with a restricted role.
* **Task Completion**: If _Users in this workflow can only complete one task_ is enabled, users cannot move on to another task after completing the one they're assigned. However, they can complete the same task again in situations where a verdict rejects the task completion.

You will encounter an error dialog if you complete a task and the next task in the workflow is missing users from its participant group. However, the error dialog will allow you to add valid users to the participant group if your permissions allow you to add users to the workflow.

## Completing Assigned Tasks

Within a document workflow, you may have tasks that require you to provide a task verdict for each document in the workflow envelope. If your task requires verdicts, you must select those individually. You can easily see which documents you have viewed in the multi document viewer. The titles of documents that you have not yet viewed appear in bold while viewed document titles appear unbolded.

### How to Complete Tasks

To complete assigned tasks:

  1. After starting a document workflow, navigate to **Home > My Tasks**.
  2. Click the **Complete** or **Continue** button to open the document workflow viewer.
  3. If you have an available task: In the workflow header, click **Accept**. Note that once you have accepted a task, you can click **undo acceptance** to release it. Once released, the task is again available to any of the assigned users.
  4. If your workflow prompts for verdicts: For each document, click **Provide verdict** on the left side of the viewer and select a verdict from the dialog. If comments are required, enter them in the text box. If a reason or capacity is required, select from the drop-down list. If document field values are required, enter or select values as prompted. Click **Apply** to save your selection and close the dialog. Alternatively, click **Apply & Next** to proceed to the next available document.
  5. Click the **Complete** button in the workflow header.
  6. A confirmation dialog opens. Review the message and click **Complete** to proceed.
  7. If your workflow prompts for an eSignature: Enter your user name and password to provide an eSignature.

If you enter information in a task completion dialog, but an error occurs that prevents task completion, Vault retains that information for the next time you try to complete the task. However, if you then edit and save any object record fields in the meantime, Vault no longer retains your updates in the task completion dialog. This functionality prevents accidental overwriting of any purposeful changes made to your document fields with the information retained in the task completion dialog. This functionality applies only to tasks with field prompts for single verdicts that apply to all items in the workflow. 

### Filtering Documents

In some cases, your workflow envelope may have a large number of content documents. To view a more manageable subset of content documents within your workflow envelope, you can filter them based on any of the document metadata fields.

## Timeline View for Document Workflows {#timeline-view}

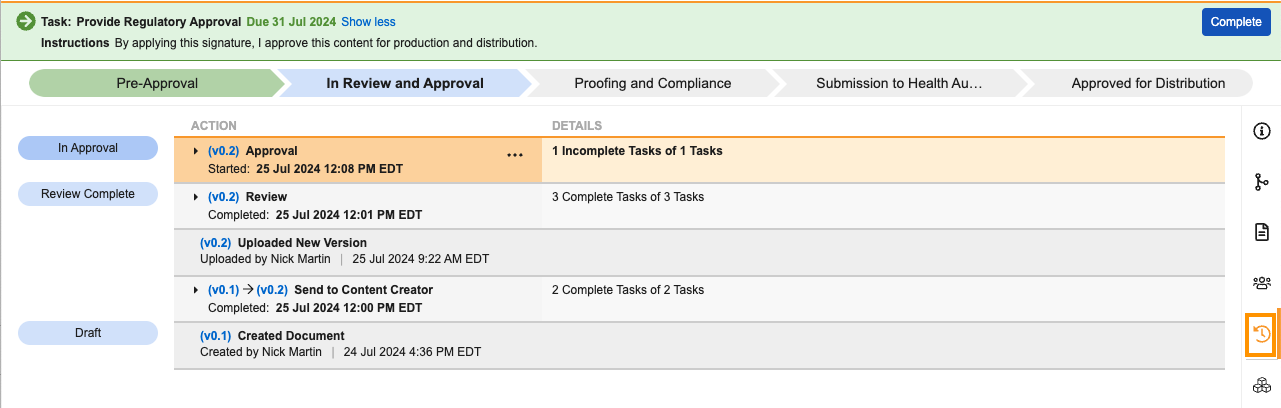
The document workflow task page includes the Timeline View option to provide a bird's-eye view of workflow-related events and verdict information.

<div class="note-border alert-info">
  <div class="alert alert-info" role="alert">
    <div><i class="far fa-info-circle"></i></div>
    <div class="alert-text">
      <p><strong>Note</strong>: The Timeline View shows a maximum of 100 tasks.</p>
    </div>
  </div>
</div>


### Accessing Timeline View

To access this view, select a document workflow task from the **Active Workflows** view on the **Home** tab. Then, select the **Timeline View** icon from the Doc Info page. You can also access this view by clicking the blue active lifecycle stage chevron, and then clicking **View all tasks**.

<a href="https://platform.veevavault.help/assets/images/sdw-timeline-view-24r23.png" data-lightbox="images" data-title="" data-alt="Single Document Workflow Timeline View">
  <img class="docimage" src="https://platform.veevavault.help/assets/images/sdw-timeline-view-24r23.png" alt="Single Document Workflow Timeline View" style=""  />
</a>

If the workflow includes multiple documents, you can also click the **Timeline View** icon  in the layout selector toolbar in the top right corner of the Doc Info page.

<a href="https://platform.veevavault.help/assets/images/mdw-timeline-view-24r23.png" data-lightbox="images" data-title="" data-alt="Multi Document Workflow Timeline View">
  <img class="docimage" src="https://platform.veevavault.help/assets/images/mdw-timeline-view-24r23.png" alt="Multi Document Workflow Timeline View" style=""  />
</a>

### Actions in Timeline View

From **Timeline View**, you can click **View Workflow History Report** for a workflow row to review the workflow and task details using a report. You can also use the **Actions** menus on active workflows and tasks to access related options such as **Cancel Workflow**, **Cancel Task**, **Add Participants**, **Update Task Due Date**, **Update Workflow Due Date**, **View Participants**, and **Reassign**.

<div class="note-border alert-info">
  <div class="alert alert-info" role="alert">
    <div><i class="far fa-info-circle"></i></div>
    <div class="alert-text">
      <p><strong>Note</strong>: The <strong>Timeline View</strong> may show tasks as assigned after the workflow ends. This situation can occur in specific configurations where the workflow reaches the <em>End</em> step while some tasks remain outstanding. However, in this instance, the <strong>Timeline View</strong> only represents the state the task was in when the workflow ended and not its current state.</p>
    </div>
  </div>
</div>


## Updating Task Due Dates {#update-task-due-dates}

To set or update a task due date:

  1. Navigate to the workflow's **Timeline View**.
  2. From the task _Details_ **Actions** menu, select **Update Task Due Date**.
  3. In the dialog, select a new date in the **Task Due Date** field.
  4. Click **Update**.

Vault notifies the task owner of the updated due date.

<div class="note-border alert-info">
  <div class="alert alert-info" role="alert">
    <div><i class="far fa-info-circle"></i></div>
    <div class="alert-text">
      <p><strong>Note</strong>: If the <strong>Task Due Date</strong> uses the workflow due date, any updates to the workflow due date will update the task due date. Updates to individual task due dates will not affect the overall workflow due date.</p>
    </div>
  </div>
</div>


## Updating Workflow Due Dates

If the workflow is configured with a due date, the workflow owner can update it in the **Timeline View** and **Active Workflows View**.


###  Workflow Due Date {#workflow-due-date-demo}


<video controls width=860 height =504  preload="metadata">
    <source src="https://platform.veevavault.help/108e9b1d-559c-4d48-918b-1e4c5b5a533c/8cb089f4-ef5f-4616-b35b-2787a1eb5e2f/8cb089f4-ef5f-4616-b35b-2787a1eb5e2f_source__v.mp4#t=0.5" type="video/mp4" >
    </video>
<br>

To update the workflow due date:
1. Navigate to the workflow's **Timeline View** or **Active Workflows View**.
2. Select **Update Workflow Due Date** from the **Actions** menu.
3. In the Update Workflow Due Date dialog, enter the new date.
4. Click **Update**.

Vault updates the workflow and notifies the workflow owner. If any tasks in the workflow are configured with the workflow due date, Vault updates those due dates and notifies the task owners.

<div class="note-border alert-info">
  <div class="alert alert-info" role="alert">
    <div><i class="far fa-info-circle"></i></div>
    <div class="alert-text">
      <p><strong>Note</strong>: Users with the permission <em>Update Workflow Dates</em> and Atomic Security <em>Active Workflow Actions: Update Workflow Due Dates</em> can also update due dates on workflows even if they are not the Workflow Owner.</p>
    </div>
  </div>
</div>


## Removing Documents {#remove-documents}

When the Workflow Initator removes a document from a document workflow, Vault uses the _Workflow Cancel State_ to move the document to an appropriate lifecycle state. If the envelope contains only a single document, the Workflow Initiator cannot remove it. If you are the Workflow Initiator, follow these steps to remove a document from the workflow:

  1. Hover over the document's name in the list on the left side of the viewer.
  2. Click the **X** icon.
  3. In the confirmation window, click **Continue** to confirm. This action is not reversible.

If there was a verdict in a completed task before the Workflow Initiator removed a document, verdicts for removed documents remain visible in Workflow Timeline views.

## Canceling Workflows {#canceling-workflows}

Sometimes it is necessary to stop an active workflow and remove all outstanding tasks from participants' lists.

### How to Cancel Workflows

To cancel an in-progress workflow:

1. Navigate to **Home > Active Workflows** or to the [**Workflow Timeline**][14] view.
2. Click on the **Actions** menu and select **Cancel Workflow**.
3. If prompted, provide a comment for the cancelation.
4. In the dialog, click **Continue**.

### Workflow Cancel State

By default, the document returns to the state it was in when the workflow started. However, an Admin can change this setting to either any available lifecycle state or prompt the workflow to remain in the state it was canceled in. They may also configure the workflow to skip any entry actions upon cancelation.

## Replacing the Workflow Owner {#replace-workflow-owner}

If you have the correct permissions, you can replace the owner of an active workflow:

  1. From the workflow's **Actions** menu, choose **Replace Workflow Owner**.
  2. In the dialog, select a user to replace the current workflow owner. Only users with permissions to start this type of workflow are available as replacement owners.
  3. Click **Submit**.

Vault reassigns all current tasks that were assigned to the _Workflow Owner_ participant group to the new owner, and all future tasks will be assigned to the new owner. Vault notifies the previous and new workflow owners of the replacement.

## Emailing Workflow Participants

This action allows you to send an email to one or many workflow participants to remind them of approaching or past due task due dates or to notify them of workflow changes.

To email workflow participants after the workflow has started:

  1. Navigate to **Home > Active Workflows**, the **Timeline View** of the Doc Info page, or the **Active Workflows** panel.
  2. From the workflow's **Actions** menu, choose **Email Participants**.
  3. In the dialog box, choose the **Recipients** of the email. You can choose individual workflow participants or an available [participant group][13].
  4. In the **Message** field, enter a message.
  5. To include yourself as a recipient, select the **Send a copy to myself** checkbox.
  6. Click **Send**.

### Participant Groups {#participant-group}

When emailing workflow participants, you may see the following recipient groups available for selection:

  * **Available Task Owners**: Users who have a task available to accept.
  * **Completed Task Owners**: Users who have completed the current or previous task.
  * **Pending Task Owners**: Users or groups who have accepted an available task, but have not yet completed it. Future tasks are not included.
  * **Incomplete Task Owners**: Users who have not yet completed an assigned task. Future tasks are not included.

## Related Permissions {#permissions}

The following permissions control various workflow actions:

|Type|Permission Label|Controls|
|--- |--- |--- |
|Security Profile|Application: Workflow Administration: Cancel|Ability to cancel an open workflow task via the _Cancel Task_ action or active workflow via the _Cancel Workflow_ action and remove all outstanding tasks from participants' lists. If your Vault uses [Atomic Security for Active Workflow Actions](/en/lr/47850/#active-workflow-actions), users must have both this permission and access through Atomic Security.|
|Security Profile|Application: Workflow Administration: Update Workflow Dates|Ability to update task due dates. If your vault uses Atomic Security for Active Workflow Actions, users must have both this permission and access through [Atomic Security](/en/lr/62043/).|
|Security Profile|Application: Workflow Administration: Email Participants|Grants permission to email workflow participants. If your vault uses Atomic Security for Active Workflow Actions, users must have both this permission and access through [Atomic Security](/en/lr/62043/).|
|Security Profile|Application: Workflow Administration: Replace Workflow Owner|Ability to replace the workflow owner. By default, only administrator profiles such as Vault Owner, System Administrator, and Business Administrator have this permission.|

 [2]: #library
 [3]: #cart
 [4]: #binder-section
 [5]: #hierarchy-viewer
 [6]: #single-document
 [10]: #remove-documents
 [11]: #update-task-due-dates
 [12]: #adding-participants
 [13]: #participant-group
 [14]: #timeline-view
 [15]: #advanced-start-workflow-doc
 [16]: #canceling-workflows