Using the Clinical Operations-EDC Connection, organizations with both a Clinical Operations CTMS or eTMF Vault and one or more EDC Vaults can exchange data in near real-time. To use the Clinical Operations-EDC Connection, you must configure the relevant components, connect any existing data, and activate the connection. This setup requires configuration steps in both Vaults.
Note: You can connect a single Clinical Operations Vault with up to five EDC Vaults. If you need to connect more EDC Vaults to the same Clinical Operations Vault, contact Veeva Support.
Clinical Operations-EDC Connection Components
Connections
The following Connections are available from Admin > Connections:
- CDMS/Clinical Operations Connection (
cdms_clinops_connection__v) in your Clinical Operations Vault - CDMS/Clinical Operations Connection (
cdms_ctms_connection__v) in your Clinical Operations EDC Vault
You must establish the Vault to Vault connection before you can use this connection. Once you have configured one connection, you can easily copy it to create a new connection.
Integrations
The CDMS/Clinical Operations Connection record includes the following default Integration records with standard Integration Point records in your Clinical Operations Vault:
|
Integration Name |
Integration Point Name(s) |
Sent From |
Sent To |
Included Data |
|---|---|---|---|---|
|
Study Data Integration |
Study Integration Point |
CTMS |
EDC |
|
|
Study Country Integration Point |
CTMS |
EDC |
|
|
|
Site Integration Point |
CTMS |
EDC |
|
|
|
Study Site Plan Integration |
Study Site Plan Items |
CTMS |
EDC |
|
|
Subject Data Integration |
Subject Integration Point |
EDC |
CTMS |
|
|
Visit Definition (Event Definition) |
Visit Definition Integration Point |
EDC |
CTMS |
|
|
Visit Group Definition Transfer Integration Point |
EDC |
CTMS |
|
|
|
Visit Definition to Visit Group Definition Integration Point |
EDC |
CTMS |
|
Subject Visit Data |
Subject Visit Integration Point |
EDC |
CTMS |
|
|
Protocol Deviation |
Protocol Deviation Transfer Integration Point |
EDC |
CTMS |
|
|
Procedure Integration |
Procedure Transfer Integration Point |
EDC |
CTMS |
|
|
Procedure Definition Transfer Integration Point |
EDC |
CTMS |
|
|
|
Closeout CRFs |
Closeout CRFs |
EDC |
eTMF |
|
*The connection only transfers this data if SDV Requiredness is enabled in your Vault.
**The connection only transfers this data if Repeating Visits are enabled in your Vault.
Note: You must enable the Visit Definition and Visit Group Definition Transfer integration points to allow the Visit Definition to Visit Group Definition integration point to transfer data.
Study CDMS Connectivity
Clinical Operations Vaults track each integration point for a Study in a Study CDMS Connectivity record. Study CDMS Connectivity records include the Connected Status, Study, Integration, and Integration Point. The Last Run Time displays the last time Vault ran the integration connection job, while the Last Successful Run Time displays the last time Vault ran the integration connection job with no errors for the study, integration, and integration point. Vault reprocesses integration points on the next connection job run when the Study CDMS Connectivity record for the integration point has a Last Modified Date more recent than the Last Run Time. Additionally, the connection retries failed items from previous runs.
Important: Vault manages Study CDMS Connectivity records. Do not edit Study CDMS Connectivity records unless instructed to by a Veeva representative.
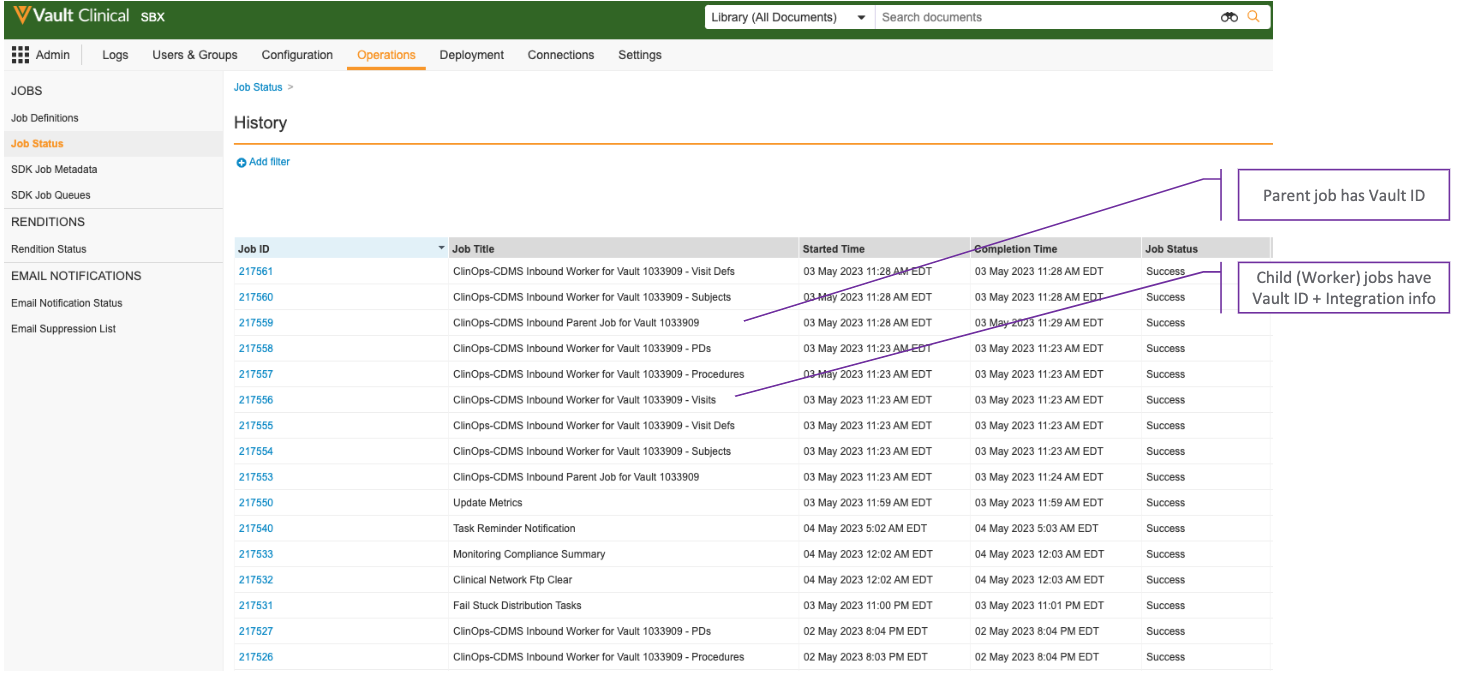
Job Labels
In order to facilitate testing and troubleshooting, Vault labels the connections’ Clinical Operations inbound jobs with information about the source EDC Vault and integration associated with the job. This is particularly useful if your organization connects your Clinical Operations Vault with multiple EDC Vaults, or if you have frequent data transfers between the Vaults.
The job labels contain information that makes it easier to see which connection is associated with a job. For example, parent job labels have the following format: “ClinOps-CDMS Inbound Parent for Vault <EDC Vault ID>”. As such, “ClinOps-CDMS Inbound Parent for Vault 11432” is the label for the inbound parent job that handles EDC Vault 11432. Single Study refresh parent jobs have a similar format: “ClinOps-CDMS Study Refresh Parent Job for Vault <EDC Vault ID>”.
Worker jobs have a similar format, but contain additional information. The worker job label format is “ClinOps-CDMS Inbound Worker for Vault <EDC Vault ID> - <Integration Code>”. As an example, “ClinOps-CDMS Inbound Worker for Vault 11432 - Visits” is the label for the inbound worker job that processes Subject Visits coming from EDC Vault 11432. Single Study refresh worker jobs have a similar format: “ClinOps-CDMS Study Refresh Inbound Worker for Vault <EDC Vault ID> - <Integration Code>”.
Worker job labels contain the following integration codes:
- Procedures: Processes Procedures
- Procedure Defs: Processes Procedure Definitions
- PDs: Processes Protocol Deviations
- Visits: Processes Subject Visits
- Subjects: Processes Subjects
- Visit Defs: Processes Visit Definitions
- Visit Group Defs: Processes Visit Group Definitions
- CRFs: Processes Closeout CRFs
- Study Site Plans: Processes Study Site Plans
Initial Configuration Overview
You only need to complete the steps in this section once to configure the Clinical Operations-EDC Connection:
- In the Clinical Operations Vault: Add fields to the relevant objects, update the User Exception Message configuration, and create flash reports.
- In the EDC Vault: Create or update Study and Site Status reference lookups as necessary and configure the Business Admin menu.
- In both the Clinical Operations and EDC Vaults: Map objects, object field reference lookups, and connect any preexisting records across both Vaults.
- In both the Clinical Operations and EDC Vaults: Activate the connection.
- Optional: In the Clinical Operations Vault: Enable restricted data transfer to enable handling of blinded and unblinded content from EDC.
Note: Some additional configuration may be required for your Vaults. Prior to setting up the Clinical Operations-EDC Connection, we recommend contacting Veeva Support.
Clinical Operations Object Field Configuration
Update the following object fields in Clinical Operations:
- Add the Connect to Vault CDMS field to the Study page layout.
- Add the CDMS Connection field to the Study page layout.
- Add the Study Phase field to the Study object page layout and make it a required field.
- Add the Site Timezone field to the Site object page layout and make it a required field.
- Ensure the Protocol Deviation Status field on the Issue object is enabled for the Protocol Deviation object type.
- Add the Casebook Link (
casebook_link__v) field to the Subject, Visit, Monitored Subject, and Monitored Visit page layouts. This field links directly to the relevant review page in the EDC Vault where the casebook is managed, whether the Clinical Operations Vault is connected to a single or multiple EDC Vaults. - Ensure that users who use the Casebook Link field have access to the EDC Redirect page in the relevant permission sets.
Note: If your organization previously utilized the custom Casebook Link (casebook_link__c) formula field on the Subject, Visit, Monitored Subject, or Monitored Visit page layouts, you should remove it, and replace it with the standard Casebook Link field (casebook_link__v).
- Make the Organization field on the Site object a required field.
- Ensure the Subject ID field on the Subject object is not unique.
- Ensure the
summary_ctmsfield on thepdv_clinobject has a field length of at least 500 characters. - Change the Review for SDV field label on the Subject Visit object to SDV Complete?.
- Change the Review for DMR field label on the Subject Visit object to DMR Complete?.
- Change the Review for SDV field label on the Monitored Subject Visit object to SDV Complete?.
- Optional: Configure query object rules. When creating query object rules for a particular object, consider the effect the rule will have on related objects.
Note: When you create query object rules for the Event object, do not select the Event object for the Query Object field. Selecting the Event object will result in an error. You must select the Event Deltas object and limit the query object rules to fields available in the Event Deltas object.
Configuring Subject Matching on External ID
The CDMS-CTMS Connection: Disable Subject Matching on External ID setting allows you to control whether Vault attempts to match Subject records using the External (RTSM) ID field or not.
By default, this setting is set to False (in other words, External ID matching is enabled). Vault uses the External (RTSM) ID field to link Subject records from CTMS to Subject records in EDC if the Subject records are not already linked via the Global ID field. If matching External (RTSM) ID fields are identified, Vault links the two Subject records and updates the CTMS Subject record with the Global ID from the EDC Subject record. This is useful in situations in which a Subject record was created in CTMS before being created in EDC, such as for pre-screening purposes. Going forward, Vault continues to update the CTMS Subject record based on changes to the EDC Subject record based on matching the Global ID fields.
If desired, you can contact Veeva Support to set the CDMS-CTMS Connection: Disable Subject Matching on External ID to True (in other words, External ID matching is disabled). Vault then does not attempt to match the External (RTSM) ID fields and, instead, only evaluates the Global ID fields of the two Subject records. If there is no match, Vault creates a Subject record in CTMS corresponding to the EDC Subject record. If there is a match, Vault updates the CTMS Subject record accordingly.
Subject Matching on External ID
When transferring subjects from EDC, the Clinical Operations-EDC Connection will check whether the Subject is linked via the Global ID field. If the Subject is not linked, the connection will also try to match on an External ID, if this field is not empty. If a match is still not found, the connection will create a new Subject and link it using the Global ID field.
If desired, the additional matching on External ID can be disabled by contacting Veeva.
User Exception Message Configuration
Make the following changes to the User Exception Message object configuration:
- Navigate to Admin > Configuration > Objects > User Exception Message > Actions and create a new action. Select the Reprocess Request action and click Save.
- Update the User Exception Message object page layout to include a related object section for User Exception Items. Select the radio button to Prevent record creation.
- Ensure that the columns in the User Exception Items section are in the following order:
- Exception Item Name
- Error Type
- Error Message
- Item
- Item Data
Configuring Flash Reports
We suggest creating a flash report to track and resolve any issues that occur with the connection. First, create a new Report Type:
- Navigate to Admin > Configuration > Report Types and click Create.
- Populate required fields.
- Select User Exception Messages as the Primary Reporting Object.
- Click Add Related Object, select User Exception Items (Child) as the Related Object.
- Click Save.
Next, create the report:
- Navigate to the Reports tab and click Create.
- Select the User Exception Message with User Exception Item Report Type and click Continue.
- Add the following User Exception Message filters:
- Status equals Active
- Created Date is in the last 1 day
- In the Clinical Operations Vault: Integration in Study Data, Subjects, Subject Visits (Events), Visit Definitions (Event Definitions), Procedures, and Protocol Deviations
- In the EDC Vault: Integration in EDC to CTMS Subject Data, EDC to CTMS Subject Event Date, and CTMS to EDC Study Data
- Click Edit Columns and add the Error Type, Error Message, Item, and Item Date columns.
- Save the report.
- Schedule the report to run daily and select the Only send when at least one record is returned option from the Email and Vault notification preferences drop-down.
- Update the Sharing Settings for the report to ensure it is sent to the necessary users. We recommend sharing with one or more users on your IT team.
Configuring the Study & Site Status Reference Lookup
In EDC, there are Reference Lookups for the following fields:
- Study > Study Status: The Study lifecycle state in Clinical Operations maps to the Study Status picklist values in EDC.
- Site > Site Status: The Site lifecycle state in Clinical Operations maps to Study Status picklist values in EDC.
If the Clinical Operations Vault has custom Study or Site lifecycle states, you should add additional Reference Lookups in the EDC Vault:
- In EDC, navigate to Admin > Connections > CDMS to CTMS Connection > Reference Lookups.
- Select the
study_status__vorsite_status__vreference lookup. - Click Add.
- Add the Name of the custom lifecycle state from Clinical Operations as the Source Key and select the appropriate Target Key in EDC.
- Click Save.
- Repeat these steps for all custom Study or Site lifecycle states in Clinical Operations.
Configuring the Study Phase Reference Lookup
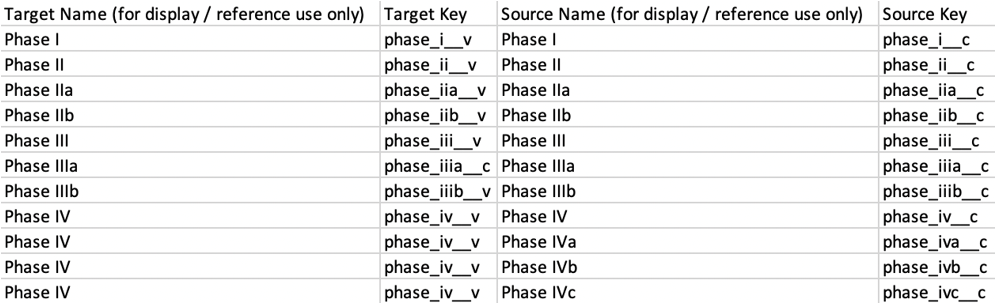
Each Study Phase in CTMS must map to a Study Phase in EDC. Because Study Phase is a system-configured field in EDC and a custom field in CTMS, you must configure this mapping manually:
- In the EDC Vault, navigate to Admin > Connections > CDMS to CTMS Connection > Reference Lookups.
- Select the
study_phase__vreference lookup. - Click Export Template.
- Open the exported CSV file in an editor.
- In the CTMS Vault, navigate to Admin > Business Admin > Picklists and click into the Study Phase picklist.
- Copy and paste the source name (Picklist Value Label) and source key (Picklist Value Name) to the CSV file. Ensure that you match the Picklist Value Label and name from the CTMS Vault with the Picklist Value Label and name from EDC. Multiple items from CTMS can map to one item in EDC. You can add custom picklist values to EDC as desired. Every picklist value from CTMS should be mapped to avoid errors. The resulting CSV file may look like this:
- Save the CSV file in the editor.
- In the EDC Vault, navigate to Admin > Connections > CDMS/Clinical Operations Connection > Reference Lookups and load the reference lookup template onto the
study_phase__vreference lookup.
Mapping the Country Object
Country object records must be mapped between EDC and Clinical Operations in order to create Study Country object records.
To link Country object records using Global ID:
- In both the Clinical Operations Vault and EDC Vault, use Vault Loader to export Country object records. Ensure that you select the Include Non-editable Fields checkbox.
- Open the resulting CSV files in an editor.
- Use a VLOOKUP function to populate the appropriate Link field in EDC with the value from the Global ID field in Clinical Operations in an input spreadsheet file. For more information on using a VLOOKUP function, see the documentation for your spreadsheet editor.
- If any Countries do not automatically resolve via the VLOOKUP function, add them to the input spreadsheet manually. If any countries exist in one Vault but not the other, create these countries and map them in the other Vault.
- Save the file with the completed
idandlink__syscolumns. - Load the CSV file into the EDC Vault.
You can also map Country object records between EDC and Clinical Operations using standard country codes. When using standard country codes, if the value of the code__sys field on the Country record in EDC matches the value for the same field on the Country record in Clinical Operations, the connection considers these records linked. Additionally, the connection links Country records between the EDC and Clinical Operations Vaults if the records have identical names.
The Clinical Operations-EDC connection prioritizes Global ID linked records over standard country code matching.
Configuring the Business Admin Menu in EDC
Navigate to Admin > Configuration > Objects > Study Country and click Edit. Select the Display in Business Admin checkbox and click Save.
Enabling Restricted Data Transfer
By default, the connection only supports unrestricted (blinded in CTMS) data transfer. You can enable restricted (unblinded in CTMS) data transfer for Subject Visits and Protocol Deviations, allowing users to manage and track all subject activity from EDC. Access to restricted data is limited to users with access to the unblinded information in CTMS.
When enabled, Vault checks the event in EDC for restricted data. If present, the system first attempts to locate an existing Unblinded Subject Visit Data record in the Clinical Operations Vault. If a record exists, Vault updates the existing Unblinded Subject Visit Data with the new restricted details. If a record does not exist in the Clinical Operations Vault, the system creates an Unblinded Subject Visit Data object record to store the unblinded data.
This feature also controls the transfer of restricted and unrestricted protocol deviation data. When the Protocol Deviation integration is active, EDC Vaults only transfer unrestricted protocol deviations by default. Once you enable restricted data transfer, EDC transfers both restricted and unrestricted protocol deviations.
Vault deletes both the blinded and unblinded data in a Subject Visit record, regardless of whether restricted data transfer is enabled. Vault also deletes all protocol deviations for the given Subject Visit.
To enable this feature, navigate to Admin > Settings > Application Settings > CTMS Features and select the Enable Restricted Data Transfer checkbox.
Study Configuration Overview
After you complete the initial configuration, you’ll need to perform the steps in this section for every study in your EDC Vault that you want to connect to your Clinical Operations Vault. Follow the best practice guidelines in this section to ensure that the connection functions correctly.
Configuring the Subject Status Rule in EDC
Subject Status and Subject Status Date field values are important pieces of information in Clinical Operations. We recommend that you create a rule in the EDC Vault to populate Subject Status and Subject Status Dates in the EDC Vault, to be sent to CTMS.
Connecting Existing Record Data
Depending on your configuration prior to implementing this connection, there could be different data in each Vault. This section describes what to do in each of these scenarios.
Note: All steps described in this section should be completed before setting the Connect to Vault CDMS in Clinical Operations Vaults or the Connect to Vault Clinical Operations in EDC Vaults to Yes.
If Study, Study Country, and Site exist in Clinical Operations, but do not exist in EDC:
- Create the Study manually in EDC and add the Global ID for that Study from Clinical Operations into the Link field for that Study in EDC.
- Set the Connect to Vault CDMS field on the Study record in Clinical Operations to Yes.
- The connection updates the Study in EDC with data from Clinical Operations and creates all the Study Countries and Sites from the Clinical Operations data for that Study.
If Study, Study Country, and Site exist in both Clinical Operations and EDC:
- For each Study, take the Global ID from Clinical Operations and copy its value to the Link field for the corresponding Study in EDC.
- For each Study Country, take the Global ID from Clinical Operations and copy its value to the Link field for the corresponding Study Country in EDC.
- For each Site, take the Global ID from Clinical Operations and copy its value to the Link field for the corresponding Site in EDC.
- Set the Connect to Vault CDMS field in Clinical Operations to Yes.
- The connection updates the Study, Study Country, and Site in EDC with data from Clinical Operations.
You can also perform these steps with Vault Loader in EDC.
If Study, Study Country, and Site do not exist in Clinical Operations, but exist in EDC:
- Create all Studies, Study Countries, and Sites from EDC in Clinical Operations.
- For each Study, take the Global ID from Clinical Operations and copy its value to the Link field for that Study in EDC.
- For each Study Country, take the Global ID from Clinical Operations and copy its value to the Link field for that Study Country in EDC.
- For each Site, take the Global ID from Clinical Operations and copy its value to the Link field for that Site in EDC.
- Set the Connect to Vault CDMS field in Clinical Operations to Yes.
- The connection updates the Study, Study Country, and Site in EDC with data from Clinical Operations.
You can also perform these steps with Vault Loader in EDC.
If Subject, Subject Visit, and Visit Definition exist in CTMS, but do not exist in EDC:
This is not a valid case for this connection. You can pull in this information from an external EDC system.
If Subject, Subject Visit, and Visit Definition exist in both CTMS and EDC:
- Ensure the Study, Study Country, and Site are connected to CTMS per the configuration instructions.
- For each Subject, take the Global ID from EDC and copy its value to the Link field for the corresponding Subject in CTMS.
- For each Event, take the Global ID from EDC and copy its value to the Link field for the corresponding Subject Visit in CTMS.
-
For the latest version of Event Definitions, enter the following value in the Link field for that Visit Definition in EDC:
global id_private key. Both theglobal idand theprivate keyshould come from the latest version of the Visit Definition in EDC. The Clinical Operations-EDC Connection only uses the latest versions of Visit Definitions. - Set the Connect to Vault CTMS field in EDC to Yes.
- The connection updates the Subject, Subject Visit, and Visit Definitions in CTMS with data from EDC.
You can also perform these steps with Vault Loader in CTMS.
If Subject, Subject Visit, and Visit Definition do not exist in either CTMS or EDC:
- Ensure the Study, Study Country, and Site are connected to CTMS per the configuration instructions.
- Set the Connect to Vault CDMS field on the Study record in CTMS to Yes.
- The connection updates the Subject, Subject Visit, and Visit Definitions in CTMS with data from EDC.
In addition to the above steps, you should also choose the desired connection in the Study record’s CDMS Connection field.
Connecting a New Study
To connect new studies in EDC to Clinical Operations:
- In the Clinical Operations Vault, create the Study record and ensure that the Connect to Vault CDMS field is set to No.
- In the EDC Vault, create the Production Study Instance record and ensure that the Connect to Vault CDMS field is set to Yes.
- Take the Global ID from the Study record in Clinical Operations and copy its value to the Link field on that Product Study Instance record in EDC.
- In the Clinical Operations Vault, change the Connect to Vault CDMS field to Yes.
Connecting Subject Groups
You can enable data transferring for Subject Group assignments for subjects depending on business needs. Some configuration is required to enable the data transfer.
- In the Clinical Operations Vault, navigate to your Subject Integration Rule (
subject_integration_rule__v) and activate the Field Rule for the required Subject Groups (study_arm__v,study_cohort__v, and/orsubstudy__v). - In the EDC Vault, locate the Subject Group name (
name_v) field, typically labeled Code, for every defined Subject Group. - In the Clinical Operations Vault, locate the matching Subject Group object record and enter the EDC name into the Link (
link__sys) field on the record.
Deactivating the Field Rule for Subject Groups does not remove the links; the connection merely ignores them during the data exchange.
If you enable the field rule and a Subject record comes in with a Subject Group assignment, but the connection cannot find a linked Subject Group in the Clinical Operation Vault, the connection is displayed in a User Exception Message to indicate that a matching group was not found.
Note: Vault EDC does not support Study Part and Study Element type Subject Groups.
Connecting a New Site
When you create new sites in the Clinical Operations Vault, Vault automatically creates them in the EDC Vault. However, you must complete the following steps for each site in the EDC Vault:
- In the EDC Vault, navigate to Tools > EDC Tools and select the study.
- Navigate to the Sites tab and click on the Site Number that you want to activate.
- Enter your site’s Principal Investigator.
- Enter an Active Version and click Save.
Configuring Integration Points
Configuring the Study Site Plan Integration Point
For Clinical Operations Vaults using Veeva Site Connect. , the Study Site Plan (study_site_plan__v) integration and Study Site Plan Items (study_site_item_transfer__v) integration point enables the Clinical Operations-EDC connection. Vault uses this connection to populate and update the Actual value for the Average Number of Days to Resolve Queries field on Study Site Plan Item records for relevant Studies and Study Sites.
The Retrieve Query Metrics from EDC (retrieve_query_metrics_from_edc__v) job runs once a day in the connected Clinical Operations Vault to locate the Studies connected to EDC and using Site Connect. The job then queries EDC for the Average Number of Days to Resolve Queries value for each Study Site. The EDC Vault transfers the requested values to the Clinical Operations Vault which the system uses to populate the Actual value for the Average Number of Days to Resolve Queries field.
Activating the Study Site Plan Integration will activate the underlying Integration Point and scheduled Job.
Configuring the Protocol Deviations Integration Point
You can configure your CTMS Vault to receive protocol deviation data from an EDC Vault for connected studies. When this feature is enabled, Vault transfers Protocol Deviation types of Issues (pdv__ctms) from EDC.
To enable this feature, you need to activate the Content (blinding__v) field on the Issues (pdv__ctms) Object. To do this, navigate to Admin > Settings > Configuration and click Object Configuration. Select the Issues Object and navigate to the Fields tab. Then, edit the Content (blinding__v) field to set the field to ‘Active’ and click Save.
Once the field is enabled, activate the Protocol Deviation integration:
- Navigate to Admin > Connections > CDMS/Clinical Operations Connection.
- Find the Protocol Deviation integration in the Integrations section.
- From the Actions menu for the Protocol Deviation integration, select Activate.
Configuring Procedures
In CTMS Vaults with Veeva Payments, you can configure Vault to receive Procedures when records are generated and updated in EDC for a connected study. Note that for Vault to transfer Procedures, the Names of the Procedure Definitions must be identical in both Vaults.
First, you must activate the values for the Procedure Status picklist:
- Navigate to Admin > Settings > Application Settings and click Edit.
- In the CTMS Features section, set the Enable Procedure Status Standard Picklist Values checkbox.
- Click Save.
We recommend reviewing any existing custom procedure definition picklist values in your Vault and setting them to inactive.
After you enable the Procedure Status picklist values, activate the Procedures integration:
- Navigate to Admin > Connections > CDMS/Clinical Operations Connection.
- Find the Procedures integration in the Integrations section.
- From the Actions menu for the Procedures integration, select Activate.
Once the integration is activated, Vault will transfer new Procedure records and updates to existing Procedures from EDC to CTMS.
Configuring Repeating Visits
You can configure your CTMS Vault to receive repeating visit information from EDC. To enable this feature, navigate to Admin > Settings > Application Settings and click Edit. In the CTMS Features section, set the Enable CDMS & Clinical Operations Repeating Visits Integration checkbox, and click Save.
Once enabled, add the following fields to the relevant objects, page layouts, and reports:
- Visit Name (Repeat Visit Name in EDC)
- Visit Label (Override Label in EDC)
- Repeating Visit (Repeat Visit Definitions in EDC)
If your Vault includes the Vault Payments add-on product, Payable Items are generated based on the shared Visit Definition for each Subject Visit.
About SDV Requiredness
Vault transfers the value of the SDV Mode field from EDC when the event is required.
This behavior was previously controlled by an Application Setting. It is now automatically available in all impacted Vaults.
Configuring Closeout CRFs
You can configure your eTMF Vault to receive closeout Case Report Files (CRFs) from EDC. The eTMF Vault stores the CRF files as individual documents.
Before you configure the Closeout CRFs integration, your Vaults must have the following:
- Study records linked between EDC and Clinical Operations Vaults
- Country records linked by Global ID or standard country codes
When the Clinical Operation-EDC connection creates Study Country and Site records, the records automatically link between the Vaults. You can also manually link Study Countries and Sites using Global ID. The connection attempts to match unlinked Study Countries by their parent Country and unlinked Sites by matching the name field (name__v).
To enable the Closeout CRFs integration:
- Navigate to Admin > Connections > CDMS/Clinical Operations Connection.
- Find the Closeout CRFs integration in the Integrations section.
- From the Actions menu for the Closeout CRFs integration, select Activate.
You must enable the integration on both Vaults. After you enable the integration, configure the Document Type for EDC Closeout CRFs __setting in the eTMF Vault.
To configure the Document Type for EDC Closeout CRFs setting:
- Navigate to Admin > Settings > Application Settings and click Edit.
- In the eTMF Features section, set the Document Type for EDC Closeout CRFs checkbox.
- Select a Document Type from the drop-down. The Document Type must be a document Classification.
- Select a Lifecycle from the drop-down. The lifecycle you select must have a steady state defined.
- Click Save.
The generation and re-generation of closeout CRFs in EDC triggers the transfer of the record to the eTMF Vault. When the EDC Vault regenerates Closeout CRF records, the Clinical Operations-EDC connection updates the target CRF documents in the eTMF Vault. The connection creates the target CRF documents in the selected lifecycle’s steady state.
eTMF Vaults labels restricted closeout CRF records from EDC as Unblinded. The connection tags the Subject in the Title of the target CRF document and populates the Name, Study, Study Country, and Study Site fields with the data from the source CRF record. If the Study Country and Study Site are not linked between the Vaults, the connection matches based on the Study Site names. If the connection cannot populate any of these fields, Vault creates a User Exception and does not create the target document.
Vault tracks the Last Run Time and Last Successful Run Time for the Closeout CRFs integration in the Study CDMS Connectivity object.
When an error occurs while processing a CRF record, the connection creates a User Exception and retries the file on the next connection run.
Deleted Item Marking
When users delete Event, Subject, Procedure, and Protocol Deviation records in EDC, the Clinical Operations-EDC Connection can automatically mark these records as deleted in the CTMS Vault. This ensures both Vaults contain the most up to date information.
The Clinical Operations-EDC Connection only deletes items that were deleted in EDC within the last 30 days. If the Last Successful Run Time for an integration and Study are more than 30 days ago when the connection runs, the connection creates a User Exception Message to warn that the Last Successful Run Time was over 30 days ago. Then, it only processes the items that were deleted in the last 30 days. In other words, if you delete an item in EDC and then wait more than 30 days to run the connection, it will not be marked as deleted in CTMS. This is not a connection error, and you can manually mark the item as deleted in CTMS.
This setting is enabled by default for all Vaults.
Field Updates for Deleted Items
After the Connection finds a deletion in EDC, records in the CTMS Vault are updated as follows:
Subject (subject__clin)
| Field Label | Field Name | Value After Deletion | Comments |
|---|---|---|---|
| Link | link__sys |
Blank | |
| Subject Status | subject_status_clin |
“Deleted in CDMS” | New picklist value: deleted_in_cdms__v |
| End of Study Date | end_of_study_date__v |
Blank | |
| End of Treatment Date | end_of_treatment_date__v |
Blank | |
| Enrolled Date | enrolled_date__v |
Blank | |
| Randomized Date | randomized_date__v |
Blank | |
| Screen Failed Date | screen_failed_date__v |
Blank | |
| Screened Date | screened_date__v |
Blank | |
| Withdrawn Date | withrawn_date__v |
Blank | |
| Casebook Link | casebook_link__v |
Blank | Blanking link__sys will cause this field to be blank. |
Subject Visit (visit__v)
| Field Label | Field Name | Value After Deletion | Comments |
|---|---|---|---|
| Link | link__sys |
Blank | |
| Visit Status | visit_status__v |
“Deleted in CDMS” | New picklist value: deleted_in_cdms__v |
| SDV Complete Date | sdv_date__v |
Blank | |
| SDV Mode | sdv_mode__v |
Blank | |
| Review for DMR | rev_dmr__v |
Blank | |
| DMR Complete Date | dmr_date__v |
Blank |
Procedure (procedure__v)
| Field Label | Field Name | Value After Deletion | Comments |
|---|---|---|---|
| Link | link__sys |
Blank | |
| Procedure Status | procedure_status__v |
“Deleted in CDMS” | New picklist value: deleted_in_cdms__v |
| Procedure Date | procedure_date__v |
Blank |
Protocol Deviation (pdv_ctms)
| Field Label | Field Name | Value After Deletion | Comments |
|---|---|---|---|
| Link | link__sys |
Blank | |
| Protocol Deviation Status | pdv_cdms_status__v |
“Deleted in CDMS” | New picklist value: deleted_in_cdms__v |
Connecting a New EDC Vault
Once you have successfully established an EDC Vault connection, you can easily connect a new one by copying the existing connection. To connect another EDC Vault after the first:
- From your existing connection record’s actions menu, select Copy to new to create a new connection record that copies the existing one.
- Activate the connection.
- Update the CDMS Connection field of any connected studies, including your currently connected studies, with the new connection’s value.
- Connect the new studies.
Note: You can connect a single Clinical Operations Vault with up to five EDC Vaults. If you need to connect more EDC Vaults to the same Clinical Operations Vault, contact Veeva Support.
Refreshing and Reprocessing
Several ways are available to refresh the connection between the Clinical Operations and EDC Vaults after the initial configuration.
Single Study Refresh
Should you find a single Study’s data to be out of sync, contact Vault Support and have them perform a refresh on that Study.
Note: Prior to 22R1, Vault included an action to refresh an entire connection, effectively resetting all Studies involved. This action was removed in 22R1.
Reprocess Request
The Reprocess Request action triggers the Clinical Operations Vault to pull data from the EDC Vault as if a change had been made in the EDC Vault. This may be necessary if you fixed an issue with the User Exception Message or User Exception Item objects and want to verify the fix. To reprocess the data:
- In the Clinical Operations Vault, navigate to Admin > Connections > User Exception Messages.
- Open the User Exception Message that you want to reprocess.
- Select Reprocess Request from the Actions menu.
User Exception Messages
Vault includes the User Exception Message object and its child object, User Exception Item, to help you track and resolve any errors that occur with your Clinical Operations-EDC Connection. If either Vault is unable to process incoming data, Vault creates a User Exception Message record to capture the failure and individual User Exception Item records for each integration point that failed. Vault reprocesses integration points on the next connection job run when the Study CDMS Connectivity record for the integration point has a Last Modified Date more recent than the Last Run Time. Additionally, the connection retries failed items from previous runs.
User Exception Message Error Types
All User Exception Messages contain references to the applicable Integration and Integration Point. Some error types that you may see are:
| Error Type | Description |
|---|---|
| CONNECTION_ERROR | There is a connection error between the Vaults. This may occur if your Vault is in maintenance mode. |
| MESSAGE_PROCESSING_ERROR | There are issues delivering the Spark Message or with the query or API that is being called. This may occur if additional Field Rules were manually created or if a Field Rule that is required for the data transfer is Inactive. |
| ITEM_PROCESSING_ERROR | There are issues creating records in the target Vault. This may occur if there are missing reference lookups, missing required information, missing mapped data, or permission issues. |
User Exception Item Error Types
All User Exception Items contain a reference to the applicable User Exception Message, the Item field containing the Global ID from the source of the record that failed to be created, and the Item Data field containing the actual data used to create the record. Some error types that you may see are:
| Error Type | Description |
|---|---|
| INVALID_DATA | A record failed due to incorrect data or a reference cannot be resolved via the self-referencing query. |
| ITEM_NOT_FOUND | A field can’t be found because a custom Field Rule was added. |
| OPERATION_NOT_ALLOWED | The record was not created due to a permission issue. |
| REFERENCE_NOT_FOUND | A Reference Lookup for a record can’t be resolved. |
Related Permissions
You need a System Admin security profile as well as the following permissions to set up the standard Clinical Operations-EDC Connection:
| Permission Type | Permission | Effect |
|---|---|---|
| Security Profile | Admin: Application: Manage Connections | Ability to access the Connections tab in Admin and activate the Connections |
| Security Profile | Object: User Exception Item, User Exception Message: Read | Ability to see User Exception Item and User Exception Message records if a connection failure occurs |