TMF Transfer provides an easy way to send a TMF from a source Vault (typically a CRO) to a target Vault (typically a sponsor) with minimal mapping between Vaults. After activating an Agreement for a specific study, users in the source Vault can trigger the transfer of the study components and related documents to the target Vault.
In the target Vault, users can select transferred studies in the TMF Viewer to view all study documents hierarchically according to how the document types are mapped in the source Vault.
Note: Some configuration is required in both Vaults to utilize the TMF Transfer feature in your eTMF Vault.
Overview
- Create an Agreement in the initiating Vault that defines what data Vault will exchange.
- Send the Agreement to the receiving Vault. A user from the receiving Vault must accept and approve the Agreement for it to become active and for data exchange to begin.
- Manually trigger the data transfer to the target Vault as needed.
Vault creates a CDX ID for all Vault-managed records and documents. A CDX ID allows you to identify object records and documents across all Vaults, ensuring that both documents and object records remain in sync.
Related Objects
The following objects support TMF Transfer:
- Agreement: A record of an agreement between two Vaults that allows actual data exchange to occur.
- Agreement Activity: Captures activities related to the transfer of data between Vaults.
- CDX Rule: A rule that defines the behavior of record and document exchanges. Vault defines and provides these rules for you.
- CDX Rule Set: A set of rules that determines data transfer logic between two Vaults. Vault defines and provides these sets for you.
- Clinical Transfer Rule Override: Allows you to override specific rules for outgoing transfers.
- Clinical Transfer Override Agreement: Links a Clinical Network Rule Override record to an Agreement.
- Configuration Mapping: Maps components that have different names in the source and target Vaults.
- Field Default: Specifies default values for document and object fields.
- Scope Variable: Defines which object Vault transfers data from.
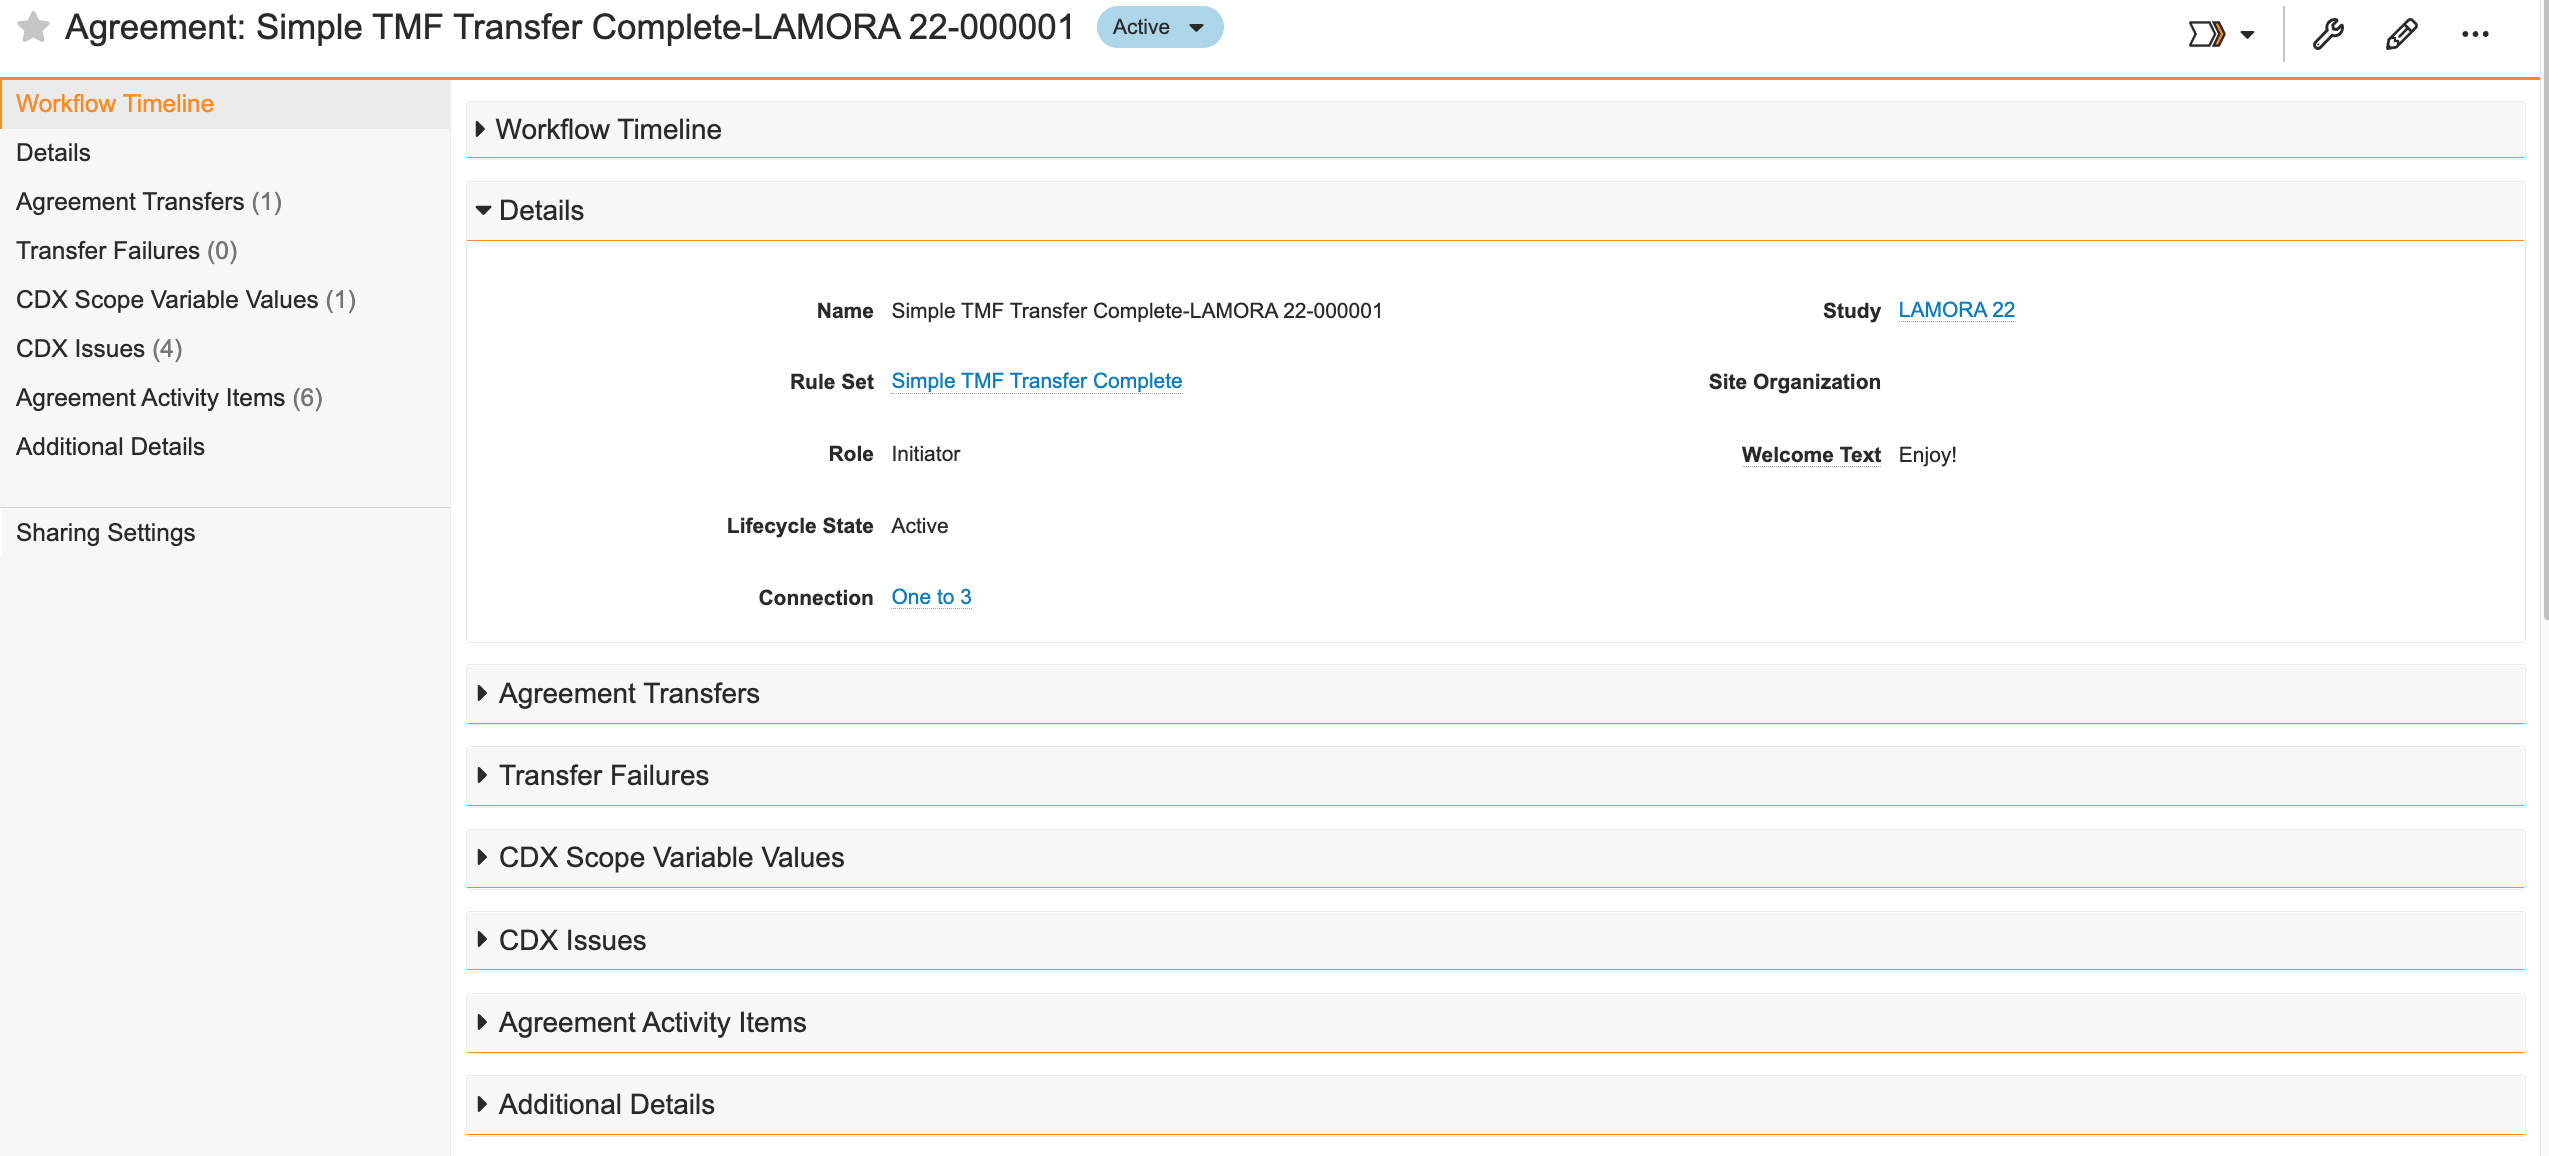
Creating Agreements
Create and send an Agreement record and have a representative from the target Vault approve the agreement. To do this:
- Create an Agreement record from Business Admin or a custom tab. You can also create an Agreement from the related object section of a study.
- Select a Rule Set.
- Leave the Role set to Initiator. Do not change the Role.
- Select a Connection.
- Select a Study from which Vault will transfer data.
- Optional: Select the Schedule Transfer checkbox to run the transfer daily.
- Click Save. This moves the agreement to the Configuring state.
- Optional: Add Clinical Transfer Rule Overrides to limit the scope of the records transferred from your Vault.
- Select Send Agreement Invitation from the Actions menu. This moves the agreement to the Pending state and creates an Agreement record in the target Vault.
Note: Add the Include TMF Documents and Schedule Transfer fields to the TMF Transfer Agreements page layout to view and select the field.
At this point, you must wait until a user in the target Vault approves the agreement and activates the connection.
Vault prevents you from reclassifying or creating new versions of transferred documents in the target Vault while the agreement is active. This eliminates risks of discrepancies between the Vaults and ensures synchronization with the source Vault.
Accepting an Agreement
Vault creates the Approve Agreement workflow task in the target Vault and sends notifications to relevant users. Once a valid user clicks Accept, and then selects the Complete verdict on the task, Vault launches the Agreement wizard.
The wizard displays details about the agreement, including the requesting Vault and study. Clicking Next displays more detailed information about the study and allows the receiving user to map the study in the source Vault to an existing study in the target Vault.
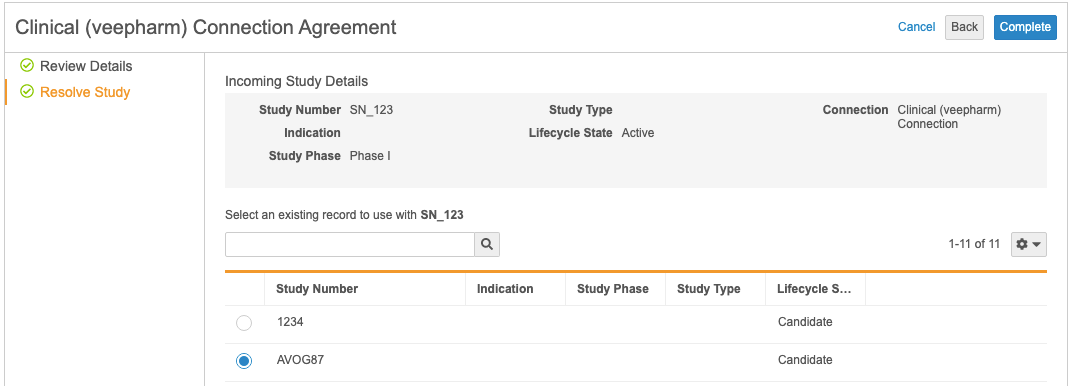
The receiving user must click Complete and approve the agreement to activate the connection.
Rule Sets
Rule sets determine what object records and documents Vault transfers. The following rule sets support TMF Transfer:
|
Rule Set |
Transferred Components |
|
TMF Transfer Complete |
|
|
TMF Transfer Blinded |
|
|
TMF Transfer (No Site Creation) |
|
|
TMF Transfer Blinded (No Site Creation) |
|
The CTMS Transfer rule set also supports the transfer of TMF documents when you select the Include TMF Documents checkbox. This selection on the CTMS Transfer prevents two separate CTMS Transfer and TMF Transfer agreements from running at the same time and simplifies the agreements process for Admin.
Note: Depending on the configuration of your Vault, you may only see the TMF Transfer Complete rule set.
Rule Overrides
Clinical Transfer Rule Overrides allow you to limit the scope of outbound records transferred between Vaults. For example, the CRO may want to only send documents to the sponsor where the QA Check Completed field is set to Yes. Create a Rule Where Clause Override record to apply this limitation to all documents and records sent to the target Vault.
Overrides only affect outbound transfers from the Vault with the override configured. They do not limit incoming transfers.
You can add Clinical Transfer Rule Overrides to Agreement records in Pending or Configuring state.
Types of Overrides
- Rule Where Clause Override: Allows you to override the Where Clause of a single Rule. For example, if the Where Clause of a Rule is
study__v = {study}and the Additional Where Clause of the override isblinding__v = 'Blinded', then Vault applies the combined clause of:study__v = {study} AND blinding__v = 'Blinded'. - Rule Set Document Where Clause Override: Allows you to override the Where Clauses for all the Rules in a rule set. For example, if a rule set contains two Rule records, one with Where Clause
study__v = {study}, the other with Where Clauseorganization__v = {organization__v}, and the Additional Where Clause of the override isblinding__v = 'Blinded', then Vault applies the combined clause of:study__v = {study} AND organization__v = {organization__v} AND blinding__v = 'Blinded'.
How to Create Rule Overrides
- Click Add in the Clinical Transfer Rule Override section of an Agreement record. You can also create Clinical Transfer Rule Overrides from Admin > Business Admin or a custom tab.
- Click Create.
- Select an override type and click Continue.
- Enter a Name for the override.
- Select a Rule Set.
- Enter additional details depending on the override type you selected above:
- Rule Where Clause Override: Select a Rule and enter an Additional Where Clause.
- Rule Set Document Where Clause: Enter an Additional Where Clause.
- Rule Override Owner: Select a Rule and an Override Owner.
- Click Save.
- Click OK to apply the override to the Agreement.
Rule Override Limitations
- You cannot add overrides to Agreements in the Active state.
- You cannot create overrides for Rules that contain a Scope Variable component. For example, you cannot override the Study variable.
- You cannot edit Clinical Transfer Rule Override records linked to an Agreement in the Pending or Active states.
- You cannot edit overrides of type Rule Override Owner if the Role field is set to Assignee.
Issues
When an agreement is unable to process a rule, Vault creates a CDX Issue record in the Vault where the error must be resolved. There are four CDX Issue Types that Vault may create:
- Record Mapping Issue: Vault creates this issue type when a required mapped record does not exist.
- Document Configuration Error: Vault creates this issue type when a mapped document type is missing.
- Server Error: Vault creates this issue type when there is an error not related to object record mapping, document type mapping, or Vault configuration.
In addition to other details, each issue record has a detailed Error Message field to inform you of what actions need to take place. For example, if a required mapped record does not exist, the Error Message field would read: “No record with mapping record or matching Link field exists”.
Resolving Issues
With every Issue record that Vault creates, it also creates a workflow that allows you to resolve the issue. The workflow for resolving an issue depends on the issue type.
Object Configuration Error Types
Selecting Run Associated Rule from the Actions menu attempts to process the failed rule again. You must ensure that you resolve any configuration discrepancies before selecting the action.
Managing Agreements
Deactivating an Agreement
You can deactivate an agreement in two ways:
- As a user in the target Vault, select the Reject verdict on the Approve Agreement workflow task.
- For an Active or Pending agreement, select Deactivate Agreement from the Actions menu. You cannot reactivate a deactivated agreement.
Pausing an Agreement
If you need to suspend an agreement for any reason, you can do so with the Pause Agreement action available on active Agreement records. Pausing an agreement moves the record to the Paused lifecycle state in both Vaults.
You can unpause an agreement with the Unpause Agreement action. This returns the agreement to the Active lifecycle state.
Activity Log
Vault captures activities related to the transferring and receiving of object records and documents using the Agreement Activity object.
Vault marks the Direction field on the Agreement Activity record as Outgoing or Incoming depending on if the object record or document sent or received.
Transferring Data
Once an Agreement is activated, users can manually trigger data transfers between Vaults. To do this, select the Transfer In Scope Documents and Records user action from the Actions menu of an Agreement record to transfer the following components to the target Vault:
- All Study Country and Study Site records, including any archived records
- All Steady state study documents with the following components:
- The source document and source rendition, including any archived documents
- The audit trail of the source document, which are attached to each document as renditions in the target Vault
- All approved versions
- Standard TMF Document Fields
- All document attachments
Vault does not transfer custom renditions uploaded to documents.
TMF Transfer follows a few guidelines:
- All documents transferred to the target Vault are created with TMF Document document type in Steady state.
- Unless the Scheduled Transfer field is set, no data is automatically transferred between Vaults. All transfers must be manually triggered via the Transfer In Scope Documents and Records action.
- If a document is reclassified in the source Vault after it is transferred, you must re-trigger the manual transfer to see the update in the target Vault.
- Study Country and Study Site records are created in the receiving Vault regardless of requiredness. If any required fields are missing, the records will be created without those values.
- Study archival and document archival must be enabled in both Vaults to properly transfer archived records and documents. Vault creates all records and documents in the default state when archiving is not enabled in the target Vault.
Viewing Transfer Status
Vault provides status information about your TMF Transfer in the Agreement Transfers section of the Agreement record. After performing the Transfer In Scope Documents and Records user action, Vault populates the Start Time field and reveals the current status of the transfer in the Lifecycle State field.
One of three states is shown:
- Extracting: Vault is preparing documents and records for transfer.
- Transferring: Vault is transferring content to the target Vault.
- Finished: Content has been transferred. Any failures are listed in the Transfer Failures section of the Agreement record. Vault also populates the Finish Time field.
If any Transfer Failures occurred, you can resubmit the failed items using the Retry Failed Items user action. This action is only visible if any failures are listed. Vault deletes all related Transfer Failure records when you perform this action.
Vault also creates two CSV files that you can reference for more information about your transfer status. The first lists all of the transferred items for a given Agreement Transfer and whether they were successes or failures. The second compares all of the successfully transferred items between the two Vaults for a given Agreement, regardless of which Agreement Transfer transferred the items.
TMF Document Fields
The following TMF Document fields are populated with data from the source Vault:
| Field Label | Field Name | How Vault Populates the Field |
|---|---|---|
| Content | blinding__v |
The value of the Content (blinding__v) field in the source Vault |
| Created by Clinical Transfer | created_by_clinical_network__v |
Indicates if the document was automatically created by Vault via data transfer |
| Deleted in Source System | deleted_in_source_system__v |
Indicates if the previously transferred document was deleted in the source system |
| Filing Level | filing_level__v |
The value of the Level field in the source Vault |
| Source Artifact | source_artifact__v |
References the TMF RM 3.0, TMF RM 2.0, and Vault Clinical Docs models |
| Source Subartifact | source_subartifact__v |
The name of the Subartifact document in the source Vault. |
| Source Created By | source_created_by__v |
The name of the user who created the document in the source Vault |
| Source Created Date | source_created_date__v |
The value of the Version Creation Date field in the source Vault |
| Source Doc Type | source_doc_type__v |
The classification of the document from the source Vault |
| Source Document Connection | source_document_connection__v |
The name of the Connection that Vault used to transfer the document |
| Source Document Date | source_document_date__v |
The value of the Document Date in the source Vault |
| Source Document Number | source_tmf_document_number__v |
The value of the Document Number field in the source Vault |
| Source Document Version | source_document_version__v |
The version of the document in the source Vault |
| Source Person | source_person__v |
The value of the Person in the source Vault |
| Source Product | source_product__v |
The value of the Product in the source Vault |
| Study | study__v |
he value of the Study in the source Vault |
| Study Site | site__v |
The value of the Study Site in the source Vault |
| Study Country | study_country__v |
The value of the Study Country in the source Vault |
| Title | title__v |
The value of the Title in the source Vault |
Related Permissions
You can complete all steps in this article with the standard Business Admin, System Admin, or Vault Owner profile.
If your Vault uses custom security profiles, your profile must grant the following permissions:
| Type | Permission Label | Controls |
|---|---|---|
| Security Profile | Objects: Agreement: Create, Edit | Ability to create and edit Agreement records |
| Security Profile | Objects: Clinical Network Issue: Document Configuration Error: View, Edit | Ability to view and edit Document Configuration Error types of CDX Issue records |
| Security Profile | Objects: Clinical Network Issue: Object Configuration Error: View, Edit | Ability to view and edit Object Configuration Error types of CDX Issue records |
| Security Profile | Objects: Clinical Network Issue: Record Mapping Issue: View, Edit | Ability to view and edit Record Mapping Issue types of CDX Issue records |
| Security Profile | Objects: Clinical Network Issue: Server Error: View, Edit | Ability to view and edit Server Error types of CDX Issue records |
| Security Profile | Objects: Clinical Network Rule Override: Rule Where Clause Override: Create, Edit, Delete | Ability to create, edit, and delete Rule Where Clause Override types of Clinical Transfer Rule Override records |
| Security Profile | Objects: Clinical Network Rule Override: Rule Set Document Where Clause Override: Create, Edit, Delete | Ability to create, edit, and delete Rule Set Document Where Clause Override types of Clinical Network Transfer Override records |
| Security Profile | Objects: Clinical Network Rule Override: Rule Owner Override: Create, Edit, Delete | Ability to create, edit, and delete Rule Owner Override types of Clinical Transfer Rule Override records |
| Security Profile | Application: Search: View Archive | Ability to view documents in the archive, search the document archive, and view the standard Archive tab. Note that you must also have the document role permission View Document |
| Security Profile | Application: Search: Manage Archive | Ability to archive documents and studies, upload documents to archived studies, create new records associated with archived studies, and edit metadata for archived studies |